My Project
Page 6 of 10 •  1, 2, 3, 4, 5, 6, 7, 8, 9, 10
 ![]()
Re: My Project
![]() Magic-nozzle Fri Jun 18, 2010 7:25 am
Magic-nozzle Fri Jun 18, 2010 7:25 am
the Brightest light you can see, is when you look against the stream, 90 deg side its also very bright, but not that bright as when you lookagainst it.
I dont use water enhancer anymore, my new setup is so bright, i dont need it anymore, this was just a funny studdy last year. As you can see on my pictures, the light in my stream is also visible during sunset, i dont need total darkness anymore, this is cince i upadet my setup with the 5W luxeons. Good luck and let me know if i can help. Looks great your
Pictures. you are just a little step away.
Magic-nozzle- Nozzle Grand Master

- Posts : 287
Join date : 2009-04-02
Age : 55
Location : Europe
Re: My Project
![]() Magic-nozzle Fri Jun 18, 2010 7:28 am
Magic-nozzle Fri Jun 18, 2010 7:28 am
Magic-nozzle- Nozzle Grand Master
- Posts : 287
Join date : 2009-04-02
Age : 55
Location : Europe
Re: My Project
![]() covewi Sat Jun 19, 2010 8:44 pm
covewi Sat Jun 19, 2010 8:44 pm
It is actually much better in person. Magic - how did you shoot your video?
We can see the well lit stream about 30 feet away.
Now for the fine tuning - build a decent stand - build a second fountain - then sit back and enjoy.
View My Video
View My Video
covewi- Nozzle Pro

- Posts : 248
Join date : 2009-06-07
Re: My Project
![]() Ike Sat Jun 19, 2010 9:00 pm
Ike Sat Jun 19, 2010 9:00 pm
That's some pretty nice progress in a short span of time and it looks really nice!
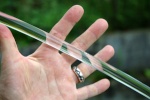
I have a question regarding your fiber optic cable. When you polished the ends of the cable that are inside the nozzle, did you leave them flat or slightly domed shaped?
Ike- Nozzle Novice

- Posts : 74
Join date : 2010-05-03
Age : 39
Location : Wyoming
Re: My Project
![]() Magic-nozzle Sun Jun 20, 2010 12:07 am
Magic-nozzle Sun Jun 20, 2010 12:07 am
covewi wrote:Finally on a hot June night with the mosquito's biting at my ankles I got the laminar stream to be completely lit.
It is actually much better in person. Magic - how did you shoot your video?
We can see the well lit stream about 30 feet away.
Now for the fine tuning - build a decent stand - build a second fountain - then sit back and enjoy.
View My Video
View My Video
This Looks Great, Conratulation! Looks diferent than mine *FUUNY*, but really great too. As i can see, you have a lot of turbulance in the Water, maybe you are too close at the outlet with the fibers, but its a nice light play like this. Yes to catch it with a cam is hard, i use a simple USB cam on my laptop, its a logitech web cam 9000 or something, newest model. Its also much brigther than the cam can catch.
As i can see, the light is flicking hardly, this has to do about the quality of the stream, also the bright an dark spots.
Hve fun and enjoy the cool Show, Great work!
Magic-nozzle- Nozzle Grand Master
- Posts : 287
Join date : 2009-04-02
Age : 55
Location : Europe
Re: My Project
![]() covewi Sun Jun 20, 2010 7:05 am
covewi Sun Jun 20, 2010 7:05 am
Ike - I polished the fountain end of the fibers and the plexiglass rod mating end "flat" - thought I would get better contact between the two
surfaces. But now I am thinking to leave the plexiglass rod "flat" and "dome" the fiber ends - this may increase the distribution of the light
within the rod.
Thoughts.
covewi- Nozzle Pro
- Posts : 248
Join date : 2009-06-07
Re: My Project
![]() covewi Thu Jun 24, 2010 5:37 pm
covewi Thu Jun 24, 2010 5:37 pm
like the water level is near the top of the 24" upright filter - looks to me that there is not enough "air pressure" in the
tube to help calm the waters.
What is the proper way to fill the low pass filter to ensure a large cushioning effect from the column of air?
Thanks
covewi- Nozzle Pro
- Posts : 248
Join date : 2009-06-07
Re: My Project
![]() Magic-nozzle Thu Jun 24, 2010 10:50 pm
Magic-nozzle Thu Jun 24, 2010 10:50 pm
covewi wrote:Low Pass Filter Problem - today my stream looked horrible. I checked out the low pass filter and shook it - it sounds
like the water level is near the top of the 24" upright filter - looks to me that there is not enough "air pressure" in the
tube to help calm the waters.
What is the proper way to fill the low pass filter to ensure a large cushioning effect from the column of air?
Thanks
You have a tiny hole in the filter!
My low pass filter is made of a PE Tube sealed in a molten manner with heat, made by a tube worker, 100% Air Tight and water pressure thight. Thats all, 2 holes, 1 at the bottom and one 5 inch above. Noting more, but you need 100% air thight. The Air cusion is filled ub by nature, nothing to do for that.
Magic-nozzle- Nozzle Grand Master
- Posts : 287
Join date : 2009-04-02
Age : 55
Location : Europe
Re: My Project
![]() Ike Fri Jun 25, 2010 6:35 am
Ike Fri Jun 25, 2010 6:35 am
I sealed the end cap around the bottom edge with some loctite plastic epoxy and it worked like a charm! 100% air tight now.
Ike- Nozzle Novice
- Posts : 74
Join date : 2010-05-03
Age : 39
Location : Wyoming
Re: My Project
![]() covewi Fri Jun 25, 2010 12:16 pm
covewi Fri Jun 25, 2010 12:16 pm
Hope this solves my problem...
Thanks
covewi- Nozzle Pro
- Posts : 248
Join date : 2009-06-07
Re: My Project
![]() John Fri Jun 25, 2010 6:53 pm
John Fri Jun 25, 2010 6:53 pm

John- Nozzle Master

- Posts : 450
Join date : 2009-04-03
Age : 45
Location : Utah -

10 and 15 watt led's
![]() covewi Sun Jun 27, 2010 8:01 pm
covewi Sun Jun 27, 2010 8:01 pm
http://www.newark.com/jsp/search/results.jsp?N=0&Ntk=gensearch_001&Ntt=categorynumber136290&displaytext=10W%20LED%20Emitter
http://www.newark.com/jsp/search/results.jsp?N=0&Ntk=gensearch_001&Ntt=categorynumber136291&displaytext=15W%20LED%20Emitter
I need to try one of these - think I will try the 10 w RGB LED first.
It would be nice to carve out a concave surface, in the end of the my plexiglass rod light rod, to match the convex surface of the LED lens and
place it directly in contact with the light rod.
The 15 w LED strips look interesting but would require building a new light box connection system.
covewi- Nozzle Pro
- Posts : 248
Join date : 2009-06-07
Re: My Project
![]() John Sun Jun 27, 2010 8:48 pm
John Sun Jun 27, 2010 8:48 pm
John- Nozzle Master
- Posts : 450
Join date : 2009-04-03
Age : 45
Location : Utah -
Re: My Project
![]() covewi Mon Jun 28, 2010 3:35 pm
covewi Mon Jun 28, 2010 3:35 pm
covewi- Nozzle Pro
- Posts : 248
Join date : 2009-06-07
Re: My Project
![]() covewi Tue Jun 29, 2010 4:45 pm
covewi Tue Jun 29, 2010 4:45 pm
I will put a screen door closure - something like this
http://www.amazon.com/National-Hardware-V1345-Touchn-Screen/dp/B000BQU5QW
between the top of the tube and the front section of the mount.
It will allow for easy angle adjustment to fit my needs.
It is made out of 3/4 inch PVC.


Really - How much do you think an 18 " long 8 " diameter fountain - filled with water - weigh?
I got some other ideas after knowing this.
covewi- Nozzle Pro
- Posts : 248
Join date : 2009-06-07
Re: My Project
![]() davo Wed Jun 30, 2010 6:23 am
davo Wed Jun 30, 2010 6:23 am
The water in the nozzle will have a volume of approximately:
V-cylinder = pi * height * radius^2
= 3.14159 * 18" * 4" * 4"
= 904.8 cu. in.
Since one cubic inch of water weighs approximately 0.036127 pounds, that gives:
weight-water = 904.8 * 0.036127 = 32.7 pounds
Schedule 40, 8" PVC weighs about 5.39 pounds per linear foot. You have 1.5 feet - so that gives:
weight-pipe = 1.5 * 5.39 = 8.1 pounds
That gets you to right around 41 pounds without counting end plates or internal rings and such. That is going to add at least a few more pounds, so I think 45 pounds total is a pretty good estimate.
Hope that helps.
-David
davo- Nozzle Newbie

- Posts : 12
Join date : 2009-10-30
Re: My Project
![]() covewi Thu Jul 01, 2010 8:15 pm
covewi Thu Jul 01, 2010 8:15 pm
Most recent photos.
https://2img.net/h/oi45.tinypic.com/2m5koec.jpg
https://2img.net/h/oi50.tinypic.com/xf0zrq.jpg
https://2img.net/h/oi48.tinypic.com/2ivib86.jpg
https://2img.net/h/oi48.tinypic.com/30i965j.jpg
https://2img.net/h/oi47.tinypic.com/24cysmu.jpg
covewi- Nozzle Pro
- Posts : 248
Join date : 2009-06-07
Magic-nozzle- Nozzle Grand Master
- Posts : 287
Join date : 2009-04-02
Age : 55
Location : Europe
Re: My Project
![]() covewi Fri Jul 02, 2010 8:36 pm
covewi Fri Jul 02, 2010 8:36 pm
https://2img.net/h/oi46.tinypic.com/4tuhzq.jpg
And the pool light off -
https://2img.net/h/oi50.tinypic.com/vsm7v6.jpg
I cant stop myself - hopefully a second fountain will be done this weekend.
covewi- Nozzle Pro
- Posts : 248
Join date : 2009-06-07
Re: My Project
![]() liteglow Sat Jul 03, 2010 4:54 pm
liteglow Sat Jul 03, 2010 4:54 pm
covewi wrote:With the pool light on -
https://2img.net/h/oi46.tinypic.com/4tuhzq.jpg
And the pool light off -
https://2img.net/h/oi50.tinypic.com/vsm7v6.jpg
I cant stop myself - hopefully a second fountain will be done this weekend.
THAT is sweeeeet !!!!!
liteglow- Admin
- Posts : 523
Join date : 2009-04-02
Age : 41
Location : Norway -
Re: My Project
![]() covewi Sat Jul 03, 2010 7:25 pm
covewi Sat Jul 03, 2010 7:25 pm
All supplies gathered and ready for tomorrows assembly.
I will make a small change in hopes of improving the stream force - I switched to stainless steel perforated sheeting - for the bottom support - with this years build
and will use fiberglass window screening for the top.
Last years fountain had perforated aluminum on the top and bottom of the straws.
I will have one of each fountain - side by side - to compare - WOW an experiment.
Last edited by covewi on Wed Jul 07, 2010 11:17 pm; edited 2 times in total
covewi- Nozzle Pro
- Posts : 248
Join date : 2009-06-07
Re: My Project
![]() John Tue Jul 06, 2010 10:15 pm
John Tue Jul 06, 2010 10:15 pm
John- Nozzle Master
- Posts : 450
Join date : 2009-04-03
Age : 45
Location : Utah -
covewi- Nozzle Pro
- Posts : 248
Join date : 2009-06-07
Re: My Project
![]() covewi Wed Jul 07, 2010 5:41 pm
covewi Wed Jul 07, 2010 5:41 pm
I replaced the top - perforated aluminum sheet - with normal fiberglass window screen.
Could that make the improvement - looks like it. I thought that the light rod might be the problem but its backed out enough
NOT to interfere with the stream.
I guess the only way to tell is to put screen in the old fountain - maybe tonight.
Also put a ball valve in line to the each fountain to adjust each stream individually.
https://2img.net/h/oi28.tinypic.com/zikrck.jpg
https://2img.net/h/oi28.tinypic.com/6hm7a1.jpg
https://2img.net/h/oi29.tinypic.com/25tf0hc.jpg
covewi- Nozzle Pro
- Posts : 248
Join date : 2009-06-07
Re: My Project
![]() covewi Wed Jul 07, 2010 11:12 pm
covewi Wed Jul 07, 2010 11:12 pm
that formed on the metal. Most likely from the Chlorine in the swimming pool.
This is why we should NEVER use aluminum in our fountains!
https://2img.net/h/oi30.tinypic.com/2s76rk9.jpg
More than 50 % of the holes are clogged.
Will cut a a piece of stainless steel for the bottom plate - adds support for the straws - and will use fiberglass window screening for the top.
Live and let learn.
covewi- Nozzle Pro
- Posts : 248
Join date : 2009-06-07
Page 6 of 10 • 1, 2, 3, 4, 5, 6, 7, 8, 9, 10 ![]()
» NEW PROJECT TIME
» my nozzle project
» How much money have your project cost you ?
» Liteglow`s laminar project
|
|
|