Version 2.0
+2
Magic-nozzle
Therons
6 posters
Page 1 of 1
 Version 2.0
I just finished my second prototype and wanted to post a few (okay a bunch) of photos. The first photo shows cutting an inside radius cut on the support for the 1" water input line, using an 8" diameter saw blade that matches the 8" diameter of the pipe. The saw blade is locked in place and the PVC fitting is moved across the blade to make the cut.
This shows how nicely the support fits against the side of the 8" tube. The 1" pipe is cut the same way and extends through the white support and through the hole in the wall of the 8" pipe.

I used a hole saw on a hand drill to angle cut the hole in the side of the tube.

Here is everything that goes inside minus the fiberglass screen and about 800 straws.
The 1 inch rings on each end are used to hold the end plates in place (see other picts below). I have a 1" dry space at the bottom of the tube for the LEDs, a 1" ring to hold the end plate, a 2" water input area, screen, 1" of foam, screen, 1" of open space, screen, straws (mine are 10 inch - not by choice, I think shorter would be nicer) (straws are self supporting and do not have a ring), screen, 2" open space, nozzle. and the tube extends another 3" to support the cutter mechanism.

The end plates lay inside the tube and a small bead of 100% RTV silicone is applied to the outside edge
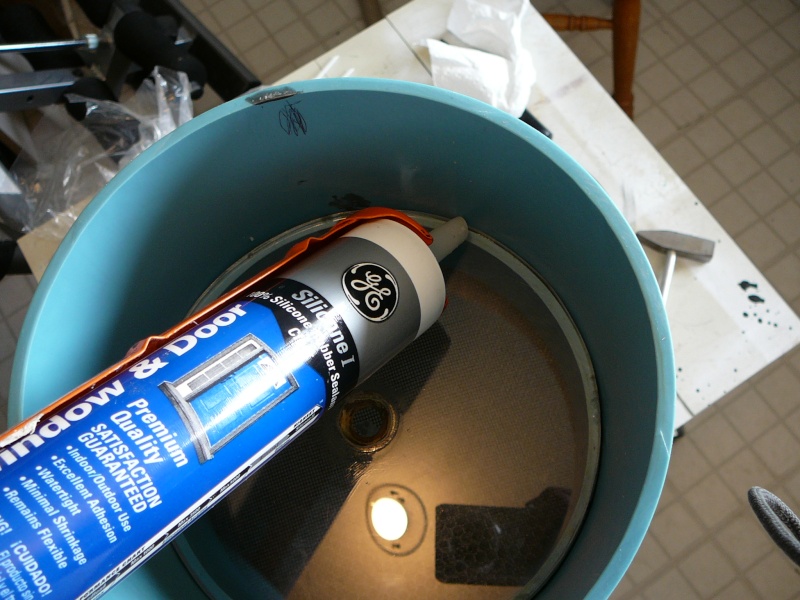
The final ring is then placed on top of the plate and Silicone. I then put a couple of screws through the tube into the ring to provide the mechanical strength. This way the silicone only provides the water seal and does not mechanically hold the end plate in the tube.

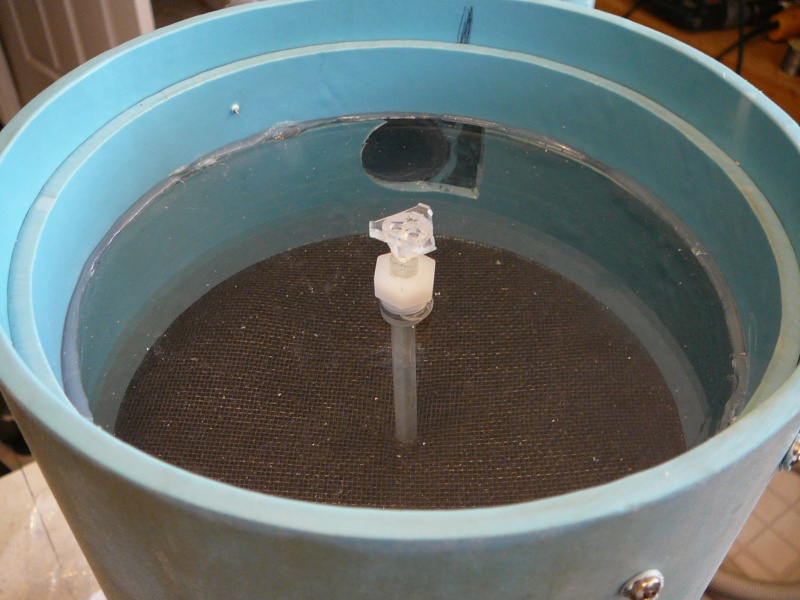
You can see the (Red Blue Green) 3mm fiber bundle through the 1/2" nozzle hole.
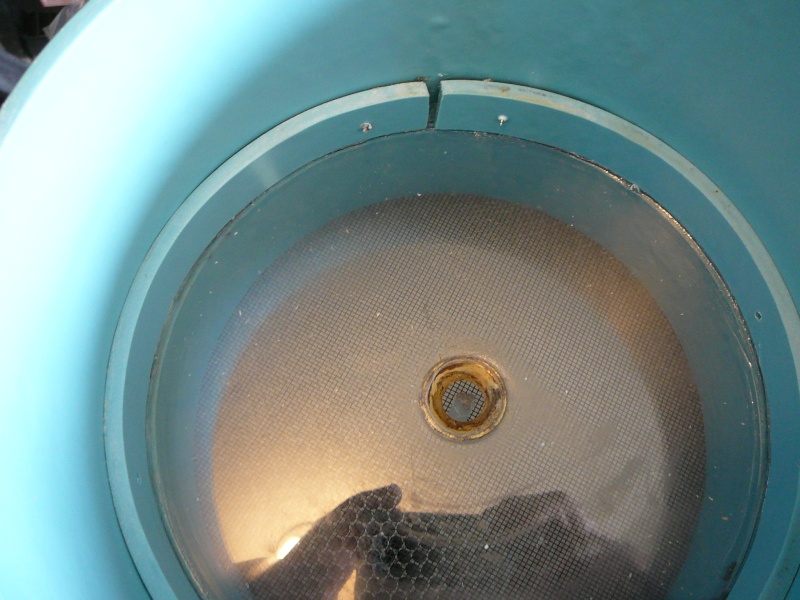
This shows the bottom with the fiber bundle and LED mounting fixture also note the ring with the screws. The fiber bundle passes through a nylon water fitting that is screwed into the bottom plate. Silicone again provides the seal for the fibers.
Tomorrow the Test

This shows how nicely the support fits against the side of the 8" tube. The 1" pipe is cut the same way and extends through the white support and through the hole in the wall of the 8" pipe.

I used a hole saw on a hand drill to angle cut the hole in the side of the tube.

Here is everything that goes inside minus the fiberglass screen and about 800 straws.
The 1 inch rings on each end are used to hold the end plates in place (see other picts below). I have a 1" dry space at the bottom of the tube for the LEDs, a 1" ring to hold the end plate, a 2" water input area, screen, 1" of foam, screen, 1" of open space, screen, straws (mine are 10 inch - not by choice, I think shorter would be nicer) (straws are self supporting and do not have a ring), screen, 2" open space, nozzle. and the tube extends another 3" to support the cutter mechanism.

The end plates lay inside the tube and a small bead of 100% RTV silicone is applied to the outside edge

The final ring is then placed on top of the plate and Silicone. I then put a couple of screws through the tube into the ring to provide the mechanical strength. This way the silicone only provides the water seal and does not mechanically hold the end plate in the tube.
You can see the (Red Blue Green) 3mm fiber bundle through the 1/2" nozzle hole.

This shows the bottom with the fiber bundle and LED mounting fixture also note the ring with the screws. The fiber bundle passes through a nylon water fitting that is screwed into the bottom plate. Silicone again provides the seal for the fibers.

Tomorrow the Test
Therons- Nozzle Novice

- Posts : 53
Join date : 2009-04-11
Location : North Salt Lake, Utah, USA
 Re: Version 2.0
Hi Therons
Wow, Very nice Work, i am impressed, looks Really professional. Your Fiber solution looks nice. Please send pictures when your test it. Do you mount the Led under the nozzle? Why not. Keep on working, can't wait to see more. The inlet is very nice. How did you cut the Lexan or Plexi Plate? looks it fits perfect.
MAGIC Mario
Magic-nozzle- Nozzle Grand Master

- Posts : 287
Join date : 2009-04-02
Age : 55
Location : Europe
 Re: Version 2.0
impressive 
I`m very glad that you post pictures of how everything is made !!!
Very very nice..
You answer allot of question with posting that pictures
I like the way you cut the inlet support, I did not understand the first photo until I did read everything.
But how do you glue the inlet support ? my PVC\ Polyurethane pipe cannot be glued with silicone or other stuff..
So the idea you use there is no good for me..
Anyway it was nice to see all the pictures let there be more..
The idea of placing LED under the nozzle is maybe what I will also do.
But then again, very important that NO water comes into there!!! (maybe add a water alarm)
I dont have any mesh filter over my straws, my head give me a strange idea that the mesh filter will break up the laminar water when it enter
I`m very glad that you post pictures of how everything is made !!!
Very very nice..
You answer allot of question with posting that pictures
I like the way you cut the inlet support, I did not understand the first photo until I did read everything.
But how do you glue the inlet support ? my PVC\ Polyurethane pipe cannot be glued with silicone or other stuff..
So the idea you use there is no good for me..
Anyway it was nice to see all the pictures
The idea of placing LED under the nozzle is maybe what I will also do.
But then again, very important that NO water comes into there!!! (maybe add a water alarm)
I dont have any mesh filter over my straws, my head give me a strange idea that the mesh filter will break up the laminar water when it enter
 Re: Version 2.0
Thanks for the encouragement! I appreciate all I've learned from you!
The inlet suppport, the 1' tube, and the 8" tube are all PVC so I just used PVC cement to hold it all together.
I think I may cover the LEDs with silicone so no water / condensation, etc will be able to penetrate. The LEDs will be mounted to an aluminum plate for heat sinking so the silicone shouldn't affect heat transfer.
If I don't like the performance on the test, I may try removing the top screen. I'm quite sure that John uses a top screen on the unit in his video.
I cut the lexan plates with a jig saw and then sanded the edges a little to remove irregularities. It doesn't have to be exact because the outside ring covers the imperfections.
I'ts raining today so I may not test until Monday. Today I think I'll install another fitting into my first prototype and convert it into a new 8" dia X 12" tall pump jitter filter.
The inlet suppport, the 1' tube, and the 8" tube are all PVC so I just used PVC cement to hold it all together.
I think I may cover the LEDs with silicone so no water / condensation, etc will be able to penetrate. The LEDs will be mounted to an aluminum plate for heat sinking so the silicone shouldn't affect heat transfer.
If I don't like the performance on the test, I may try removing the top screen.
I cut the lexan plates with a jig saw and then sanded the edges a little to remove irregularities. It doesn't have to be exact because the outside ring covers the imperfections.
I'ts raining today so I may not test until Monday.
Therons- Nozzle Novice

- Posts : 53
Join date : 2009-04-11
Location : North Salt Lake, Utah, USA
 Re: Version 2.0
Therons wrote:
I cut the lexan plates with a jig saw and then sanded the edges a little to remove irregularities. It doesn't have to be exact because the outside ring covers the imperfections.
Hi Thereons, thank you!
One more Question, how did you cut the big tubes and rings, they look very precise, don't tell me now you are using the jigsaw
Mario

Magic-nozzle- Nozzle Grand Master

- Posts : 287
Join date : 2009-04-02
Age : 55
Location : Europe
 Re: Version 2.0
Actually, I did use the jig saw yesterday to cut two rings for my filter, but they required quite a bit of scraping with the edge of a razor blade to get them trued-up.
I generally used the radial-arm saw shown in the first photo above. It only has a 10" blade so I have to raise the arm as high as possible so it only cuts a few cm into the tube and then I rotate the tube under the blade. The trick is keeping the tube from moving laterally while cutting. At first I tried to put a stop on the table (the stop would be one inch from the blade for a one inch ring) but the problem was that it was hard to hold the tube against the stop as I neared the completion of the cut because of the flex in the gap left by the saw blade. So, I put the stop on the oposite side of the table so that the long end of the tube was against the stop and then I could hold the tube against the stop as I rotated the tube through the entire cut. A little scraping with the egde of a blade was used to true the minor irregularities.
I generally used the radial-arm saw shown in the first photo above. It only has a 10" blade so I have to raise the arm as high as possible so it only cuts a few cm into the tube and then I rotate the tube under the blade. The trick is keeping the tube from moving laterally while cutting. At first I tried to put a stop on the table (the stop would be one inch from the blade for a one inch ring) but the problem was that it was hard to hold the tube against the stop as I neared the completion of the cut because of the flex in the gap left by the saw blade. So, I put the stop on the oposite side of the table so that the long end of the tube was against the stop and then I could hold the tube against the stop as I rotated the tube through the entire cut.
Therons- Nozzle Novice

- Posts : 53
Join date : 2009-04-11
Location : North Salt Lake, Utah, USA
 Re: Version 2.0
Let the testing begin!
I found that I could get a good laminar flow of about 13feet (4.9m) in length by 5 feet high (neck high in metric ) (1.5m) which is definitely large enough for my purposes!
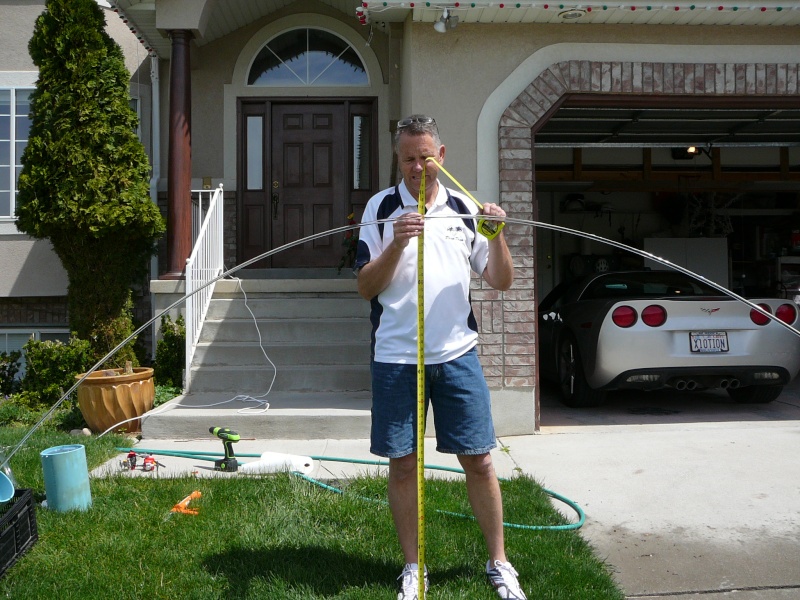
Here are a few still shots my daughter took of the "roto cutter" uncut. Yes I'm pretty proud of the nose on that stream! As you can see I'm rotating the cutter manually and I don't have a splash guard or tube placed beyond the cutter.
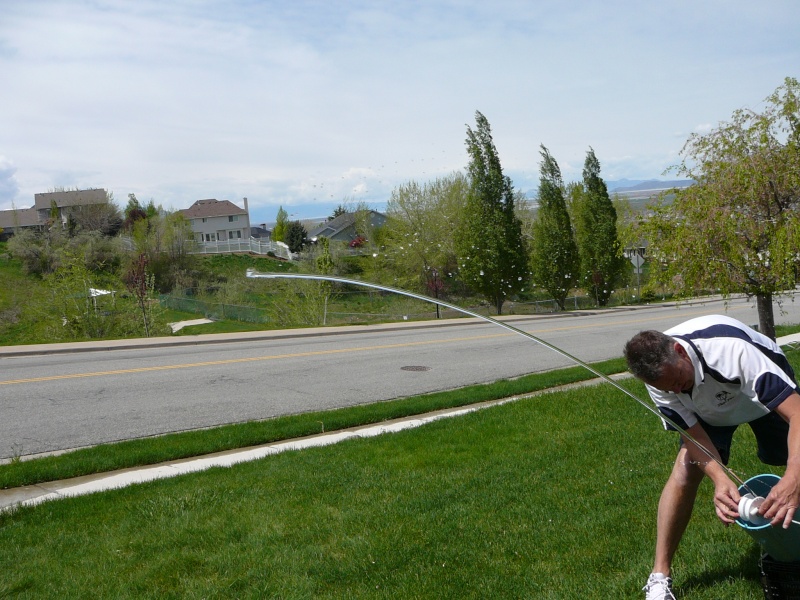
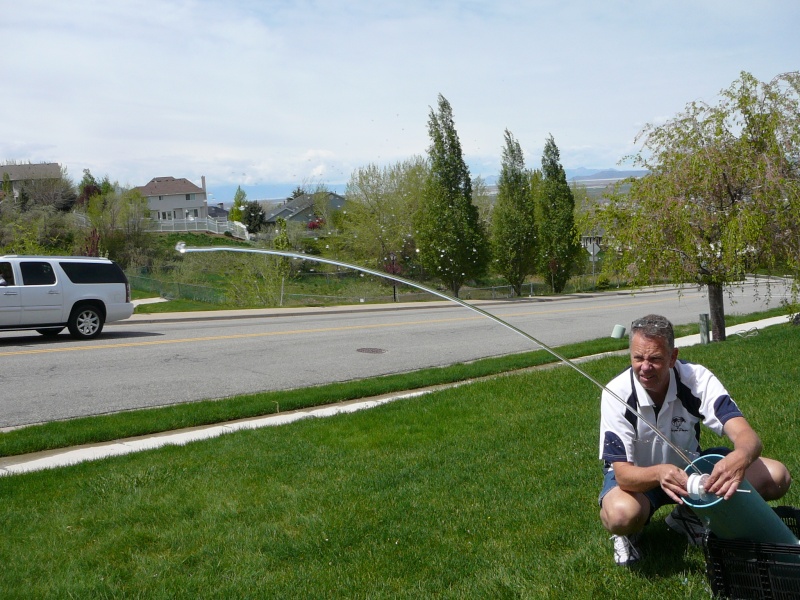
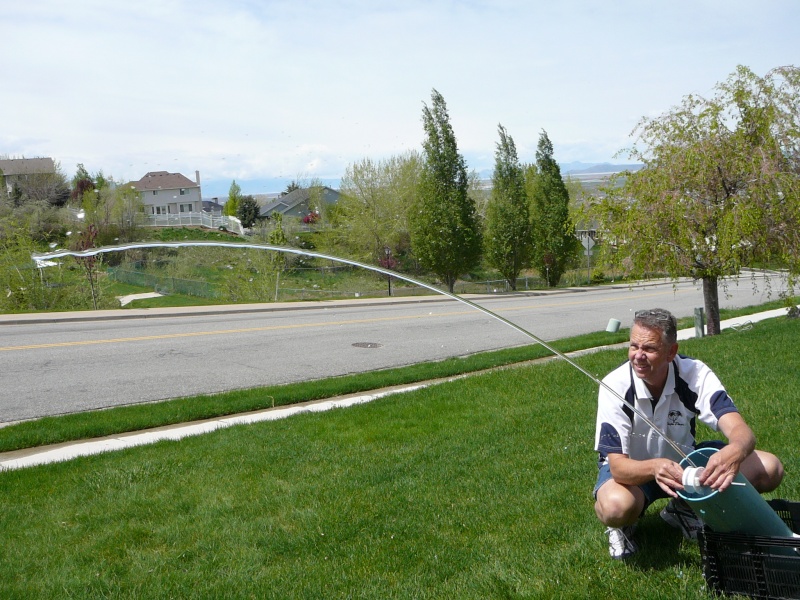
Here are a couple of raw video clips of the fountain with the pneumatics attached. I'm holding a bucket with a hole cut in it as a splash guard. The small stream that shoots out a couple of feet is just a little hole that I'm using as an air bleed. If you stop the video you can see quite a horse's tail that is created with the uncut. I think my air pressure needs to be adjusted so that the uncut is faster, however, the bucket removes it when it is in place, but I still don't think my device rotates fast enough. It seemed to be cleaner when I rotated it by hand. BTW occasionally in the video the bucket moves into the stream
One other note, I found that the tri-lumen fiber bundle would affect the laminar stream if it was closer than about 2-3 cm from the output nozzle.
This will show you how crude my set-up really is, but as my daddy says, "Form follows function."

I found that I could get a good laminar flow of about 13feet (4.9m) in length by 5 feet high (neck high in metric

Here are a few still shots my daughter took of the "roto cutter" uncut. Yes I'm pretty proud of the nose on that stream! As you can see I'm rotating the cutter manually and I don't have a splash guard or tube placed beyond the cutter.


Here are a couple of raw video clips of the fountain with the pneumatics attached. I'm holding a bucket with a hole cut in it as a splash guard. The small stream that shoots out a couple of feet is just a little hole that I'm using as an air bleed. If you stop the video you can see quite a horse's tail that is created with the uncut. I think my air pressure needs to be adjusted so that the uncut is faster, however, the bucket removes it when it is in place, but I still don't think my device rotates fast enough. It seemed to be cleaner when I rotated it by hand. BTW occasionally in the video the bucket moves into the stream
One other note, I found that the tri-lumen fiber bundle would affect the laminar stream if it was closer than about 2-3 cm from the output nozzle.
This will show you how crude my set-up really is, but as my daddy says, "Form follows function."

Last edited by Therons on Mon May 04, 2009 6:01 pm; edited 3 times in total
Therons- Nozzle Novice

- Posts : 53
Join date : 2009-04-11
Location : North Salt Lake, Utah, USA
 Re: Version 2.0
oH..
Great pictures, and video
Impressed with that nose there..
Seems like the roto cutter work !
And the best part that it`s allot more easy to mount than the solenoid cutter..
btw: Not to step on someones toes but is it possible that you "American" can say the length and measurements in cm\meeter when you talk about feet
Because feet, is something that never is used here, so it`s hard to think in the head how far that is (but THANK you for the photos)
Inch is something that is common here also..
Ah.. one more thing..
Nice car
Great pictures, and video
Impressed with that nose there..
Seems like the roto cutter work !
And the best part that it`s allot more easy to mount than the solenoid cutter..
btw: Not to step on someones toes
Because feet, is something that never is used here, so it`s hard to think in the head how far that is (but THANK you for the photos)
Inch is something that is common here also..
Ah.. one more thing..
Nice car
 Re: Version 2.0
That's a good idea. I'll start doing that. It will be good to have an understanding of everything in both meters, and feet etc.
 Re: Version 2.0
liteglow wrote:oH..
btw: Not to step on someones toesbut is it possible that you "American" can say the length and measurements in cm\meeter when you talk about feet

Because feet, is something that never is used here, so it`s hard to think in the head how far that is
I'm editing the document to include metric measurements. But I'm wondering if "toes" is metric?
Therons- Nozzle Novice

- Posts : 53
Join date : 2009-04-11
Location : North Salt Lake, Utah, USA
 Re: Version 2.0
Thank you Thereons, this will help a lot. Good luck with your Test. MArioTherons wrote:So, I put the stop on the oposite side of the table so that the long end of the tube was against the stop and then I could hold the tube against the stop as I rotated the tube through the entire cut.A little scraping with the egde of a blade was used to true the minor irregularities.

Magic-nozzle- Nozzle Grand Master

- Posts : 287
Join date : 2009-04-02
Age : 55
Location : Europe
 Re: Version 2.0
YOUR NOZZLE
Hey, this looks fantastic, great Job, looks very nice, great work. Thank you posting so many Pictures and Videos.
The nose is close to perfect on the photo. Congratulation. In the video not. Is this why holding the Bucket not exact in place? how you plan to install the compressor? It's very loud.
Good luck going forward with your Nozzle. MARIO
Hey, this looks fantastic, great Job, looks very nice, great work.
The nose is close to perfect on the photo. Congratulation. In the video not. Is this why holding the Bucket not exact in place? how you plan to install the compressor? It's very loud.

Good luck going forward with your Nozzle. MARIO

Magic-nozzle- Nozzle Grand Master

- Posts : 287
Join date : 2009-04-02
Age : 55
Location : Europe
 Re: Version 2.0
I think the reason the nose is not as good on the video is that the pneumatic ram is slower than when I was rotating it manually. I can adjust the speed/force of the ram by adjusting the air pressure when I have a good air sorce. My son is using my air compressor to work on his home so I'm using a little air pump that has no pressure tank or regulation and yes it is very loud.
Therons- Nozzle Novice

- Posts : 53
Join date : 2009-04-11
Location : North Salt Lake, Utah, USA
 Pump?
Pump?
Looks awesome
What kind of pump are you using?
What kind of pump are you using?
Last edited by pbracer on Tue May 05, 2009 1:17 pm; edited 1 time in total
pbracer- Nozzle Newbie

- Posts : 33
Join date : 2009-04-19
 Re: Version 2.0
His pump is the same as my pump in my earlier videos. I know because I borrowed it for a while. His pump is a little giant pump. I don't know the flow rate for sure, but according to my estimates it's about 20 gal/min 75 Liter/min.
 Pumps
Pumps
It is a Little Giant Pump - here is a web site:
http://www.plumbersurplus.com/Prod/Little-Giant-4E-34NR-1-12-HP-810-GPH-Small-Submersible-Pump-6-Power-Cord-(504203)/13139/Cat/773
edit (I'm not sure why the link doesn't work but you can google 4E-34NR and find it)
I salvaged four of these pumps from a used medical device so mine were free! I've got to do a little work on the cords of the other ones
http://www.plumbersurplus.com/Prod/Little-Giant-4E-34NR-1-12-HP-810-GPH-Small-Submersible-Pump-6-Power-Cord-(504203)/13139/Cat/773
edit (I'm not sure why the link doesn't work but you can google 4E-34NR and find it)
I salvaged four of these pumps from a used medical device so mine were free!
Therons- Nozzle Novice

- Posts : 53
Join date : 2009-04-11
Location : North Salt Lake, Utah, USA
 Re: Version 2.0
Therons wrote:I think the reason the nose is not as good on the video is that the pneumatic ram is slower than when I was rotating it manually. I can adjust the speed/force of the ram by adjusting the air pressure when I have a good air sorce. My son is using my air compressor to work on his home so I'm using a little air pump that has no pressure tank or regulation and yes it is very loud.
OK, I hope you can find the right speed and dont produce too much shaking, but with your Rotocutter, it seems shaking is not a problem, very clever!

Magic-nozzle- Nozzle Grand Master

- Posts : 287
Join date : 2009-04-02
Age : 55
Location : Europe
 Re: Version 2.0
I still have a lot of concern about shaking caused by the jaring of the pneumatic ram especially as it reaches the end of travel. I'm out of town untill Friday, so I won't be able to test again till then.
Therons- Nozzle Novice

- Posts : 53
Join date : 2009-04-11
Location : North Salt Lake, Utah, USA
 Re: Version 2.0
I don't think that you are going to get around any sort of jarring in whatever design comes up. I think it's just part of the design issues that we will have to deal with since we want something moving as fast as possible.
 Thickness of Plexiglass
I am new to the forum and appreciate all the great information.
I am ready to build my first nozzle and have everything except for the top and bottom plates.
What thickness is the plexiglass or lexan that is most commonly used and which material works the best?
Thanks
Covewi
I am ready to build my first nozzle and have everything except for the top and bottom plates.
What thickness is the plexiglass or lexan that is most commonly used and which material works the best?
Thanks
Covewi
covewi- Nozzle Pro

- Posts : 248
Join date : 2009-06-07
 Re: Version 2.0
covewi wrote:I am new to the forum and appreciate all the great information.
I am ready to build my first nozzle and have everything except for the top and bottom plates.
What thickness is the plexiglass or lexan that is most commonly used and which material works the best?
Thanks
Covewi
Hi there
Welcome to the forum !!
Share some pictures and tell us about your project.
I use 5mm lexan plate on the top and bottom, glued with some silicone, and screwed all around
I dont think the thickness depends on the power of your pump.
If you have a very high power water pressure, maybe it`s better to use thicker lexan plates..
 Thanks
Actually my first project, last summer, was with 4" pvc and about 12 inches long. It produced a nice 3 foot high stream the extended about 5 feet. No brass nozzle, just cut out of the pvc cap.
My new one is 8" in diameter and probably 16 inches long. Its very similiar to Therons design. I have access to a friend that will mill the brass nozzles for me.
I also will hopefully be using fiber optics to light the stream.
This company has great products:
http://www.fiberopticproducts.com/Ledlights.htm
I will start out using my pool pump and control the water flow using a value set up.
Eventually I would like to use a OASE pump (1600gpm) which would has the ability to use variable voltage input to change to pump speed. This would accomplish changing the stream through a variety of sizes.
Thanks for your input.
Photos as the project grows.
covewi- Nozzle Pro

- Posts : 248
Join date : 2009-06-07
 Re: Version 2.0
Hi covewi, this is really a nice shop! Cool led stuff. Thanks for sharing it and good luck with your nozzle.
Mario
Mario

Magic-nozzle- Nozzle Grand Master

- Posts : 287
Join date : 2009-04-02
Age : 55
Location : Europe
 Re: Version 2.0
I cut my first piece of 1/4 inch plexiglass for the 8 " dia tube today went well - looked and fit good.
Next I drilled the center hole for the water outlet (not the brass nozzle) - had a problem - in the very last bit of glass it cracked.
Will try another piece tomorrow. Any pointers for drilling plexiglass?
Also do I drill the outlet hole first then for the brass nozzle?
I am inserting a 1/2 pvc tube through the center of the tube for fiber optic lighting. Does that size seem okay?
Thanks
covewi- Nozzle Pro

- Posts : 248
Join date : 2009-06-07
Page 1 of 1
Permissions in this forum:
You cannot reply to topics in this forum|
|
|

