my nozzle project
Page 1 of 2 • 1, 2 ![]()

my nozzle project
![]() SCOOBY Mon May 10, 2010 6:56 pm
SCOOBY Mon May 10, 2010 6:56 pm


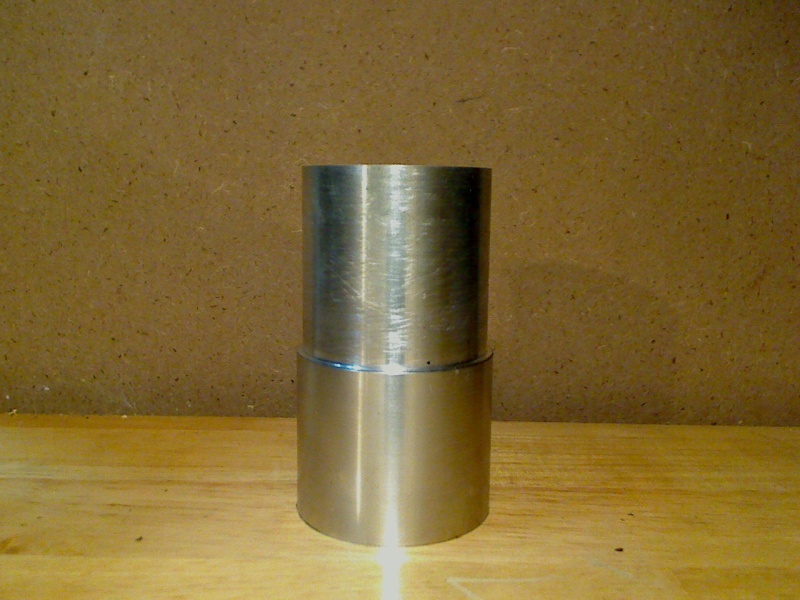
its only a 6" nozzle (its the biggest size pipe i had)
my camera decided to stop working, I'll post more once i figure out whats wrong with it
SCOOBY- Nozzle Newbie

- Posts : 17
Join date : 2010-05-10
Re: my nozzle project
![]() John Mon May 10, 2010 9:46 pm
John Mon May 10, 2010 9:46 pm

John- Nozzle Master

- Posts : 450
Join date : 2009-04-03
Age : 46
Location : Utah -

Re: my nozzle project
![]() covewi Tue May 11, 2010 3:37 pm
covewi Tue May 11, 2010 3:37 pm
How much smaller must the diameter of the disc be relative to the inside diameter of the main tube?
How much "o" ring must stick out past the groove?
covewi- Nozzle Pro

- Posts : 248
Join date : 2009-06-07
Re: my nozzle project
![]() SCOOBY Tue May 11, 2010 9:04 pm
SCOOBY Tue May 11, 2010 9:04 pm
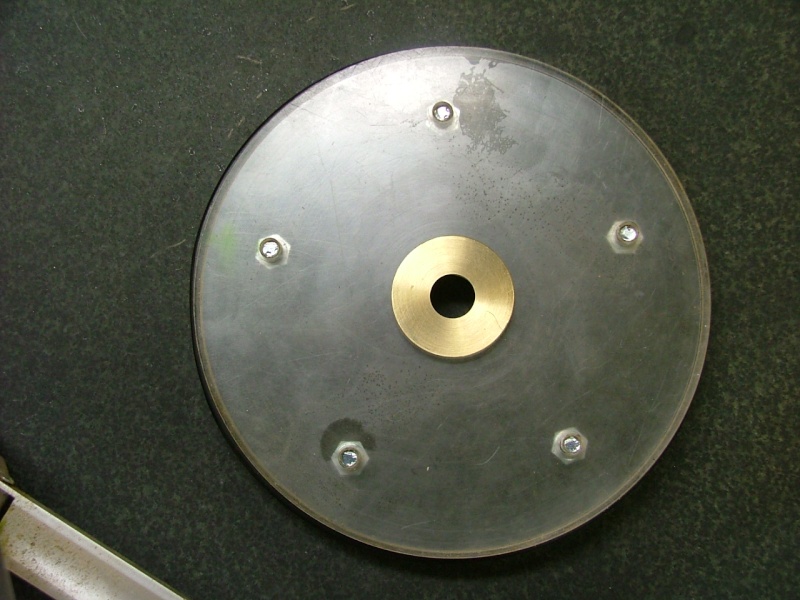
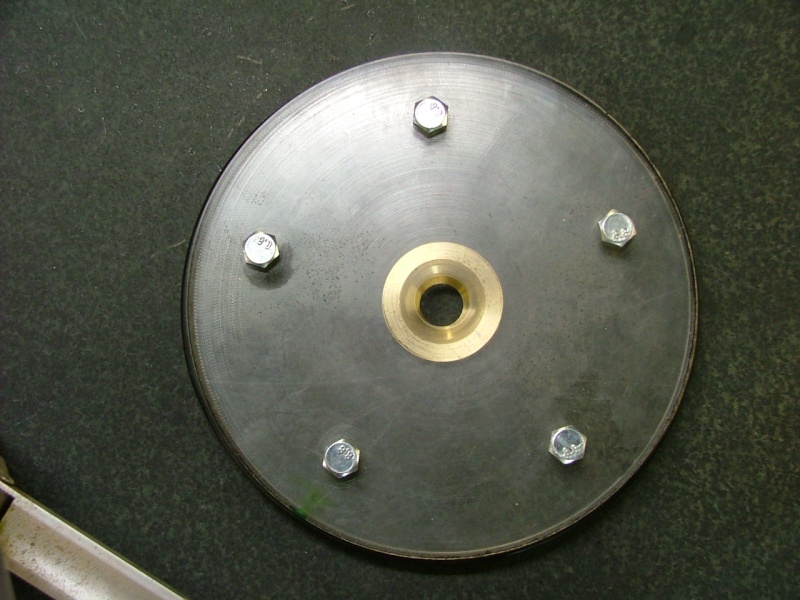
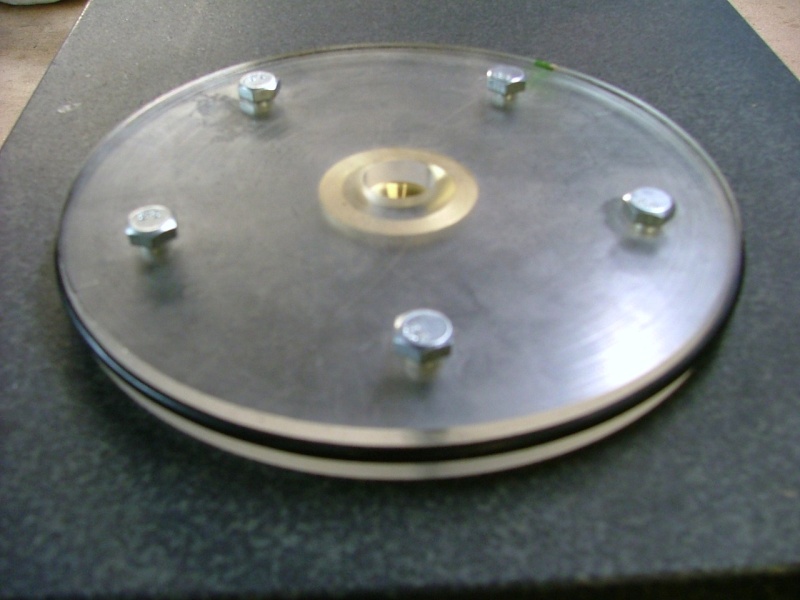
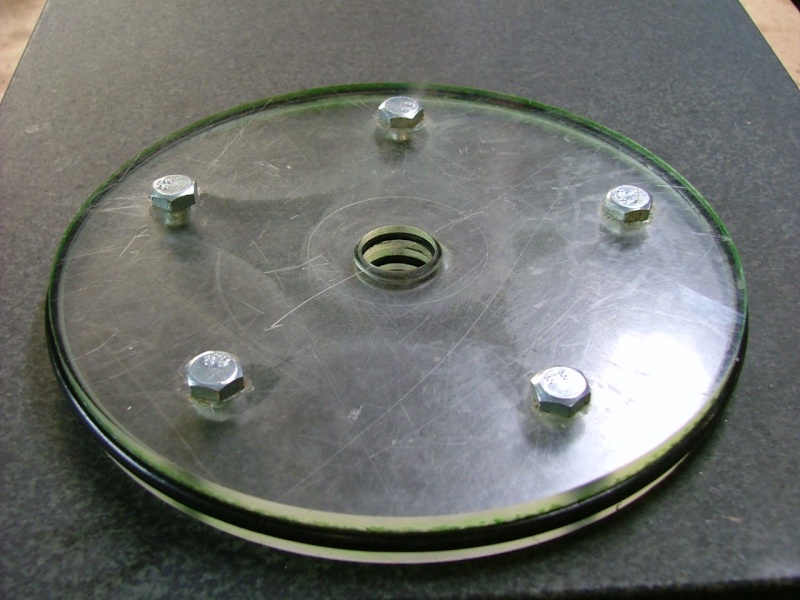
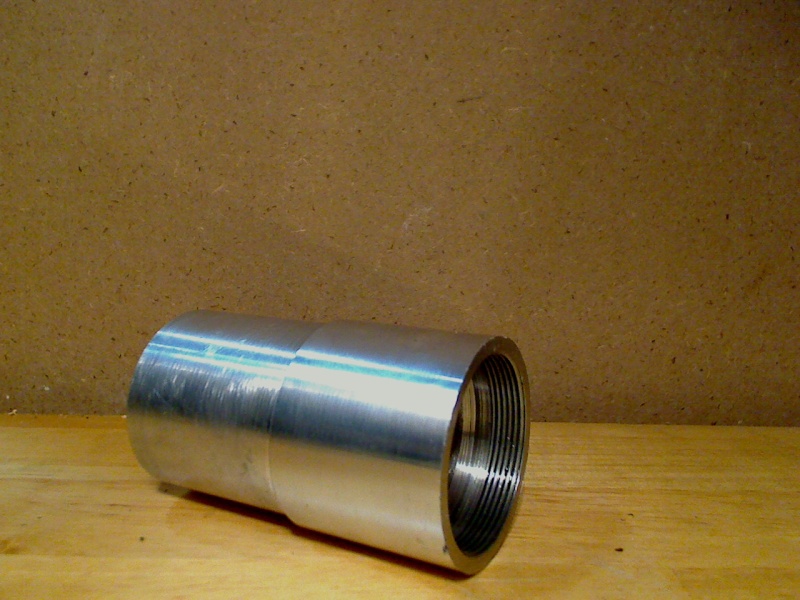
-used a 6 in hole saw to cut the plates initially
-held the plates in a chuck and bored the inner hole for all of them to fit a fine threaded bolt and nut i had (.625 dia) (made it border line press fit)
-mounted all the plates on the bolt, used the nut to tighten them togeather, then held the end of the bold in a collet and turned the outside diameter of all the plates just till they were all round (i stacked 2 togeather for each plate, top and bottom, so they end up being about 1/2" thick each plate, top and bottom.
-i tend to go to the extreme with everything, being a perfectionist, so to get the bolt pattern perfect i had a old disc brake and centered that with the plates and drilled and tapped all of them so i could bolt the plates togeather
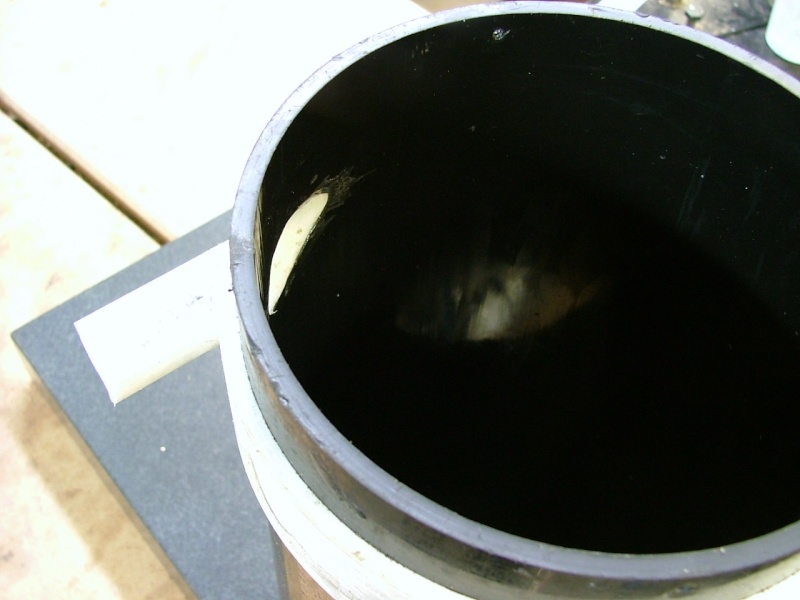
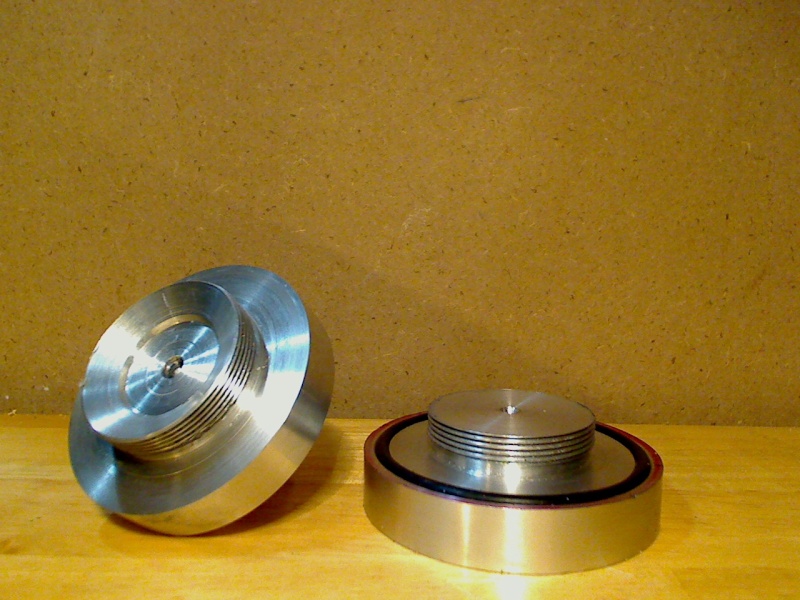
-as far as the outside oring groove, looked at what i had for o rings that i could use, they were a little small but streched ok, my chuck was about the same diameter as the turned plates, so i put the oring on that to see about how wide my groove should be, then ground a hss bit and turned away. Did alot of trial fitting because of course u can't add material back once u take it off.
I had about 3 ft of the 6in dia pipe, and i wanted to ensure the plates were perfectly perpendicular in the tube. I turned down 2 pieces of wood to fit the inside diameter exactly and on one left half of the piece of wood a larger diameter and center drilled the end (for tailstock support). This allowed me to hold the tube on the lathe (south bend heavy 10) without crushing the pipe in the chuck and it slipping out. After facing both ends, I made the spacer rings i needed by using a parting blade. I made 2 half inch wide rings to go on the ends of the pipe when assembled, so when i screwed those rings in flush with the top and bottom of the tube, and pushed the plates against them, it made sure both plates were perpendicular in the tube.
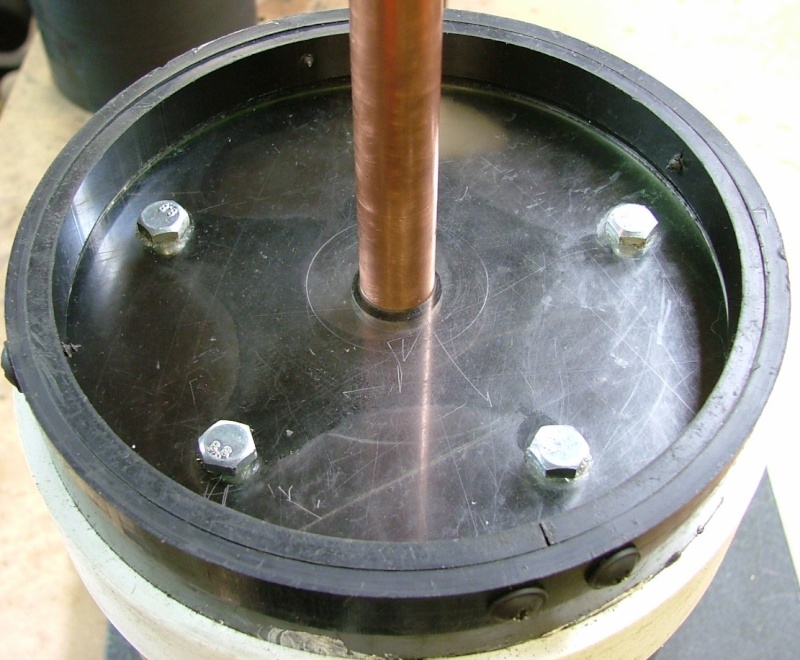
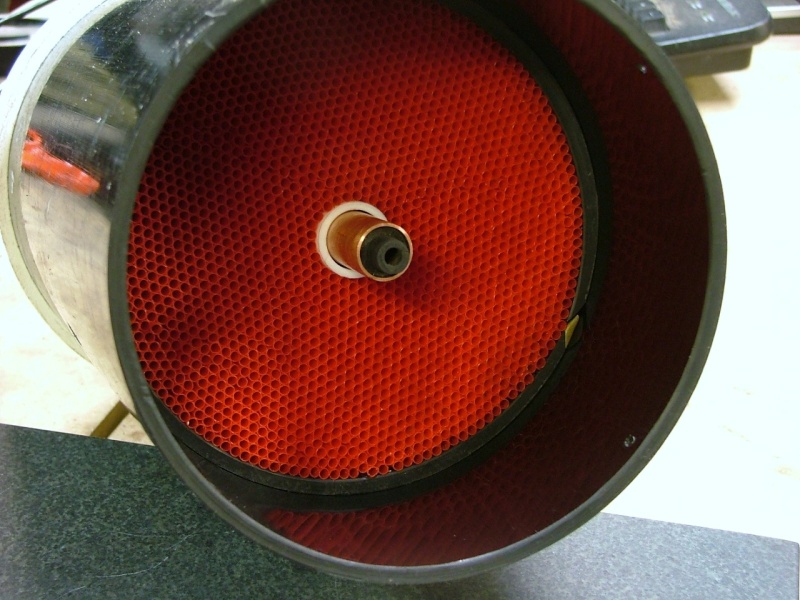
the copper pipe i had was about the same diamter of the holes i had made in the plates, so as before, i searched for orings that fit it, ground a cutter bit to bore out the groves, and did alot of trial fits. I opted for 2 inner o rings, this made it so the copper pipe was easier to keep straight in the tube and be perfectly centered. I dont have and lighting yet, but figured i'd eventually want to. The inner o rings make it so i can adjust the lighting distance to the exit orifice just by sliding the copper pipe in or out more. Another good thing about having that copper pipe in there is my first filter where the water comes in is smaller than the others. After looking at how zacharysc100 on youtube had his filter in the shape of a mushsroom kinda, i did the same thing, 'sept i'm using just smaller pads, and i made a hole in the middle of it so when mounted on the copper pipe they stayed centered, along with the other filters.
i didnt wanna have to pack straws again when and if i need to service the nozzle, so i found a piece of pvc that fit around the copper pipe and then proceded to pack straws in the flow straightener.
i'm still trying to see what type of filters work best and how many, space in between, etc.. so many variables to try. The space between my flow straightener and exit orfice is 1.250", that can be adjusted by just making more spacer rings of different width.
hopefully i'll be able to take more pics soon
SCOOBY- Nozzle Newbie
- Posts : 17
Join date : 2010-05-10
Re: my nozzle project
![]() covewi Wed May 12, 2010 3:37 pm
covewi Wed May 12, 2010 3:37 pm
Another question - I noticed that your water inlet is perfect - how did you cut your hole to fit the water inlet pipe?
It seems when drilling a hole - at an angle - into a curved surface( of the main tube) the drilled hole comes out oblong.
Any helpful hints.
covewi- Nozzle Pro
- Posts : 248
Join date : 2009-06-07
Re: my nozzle project
![]() SCOOBY Wed May 12, 2010 4:00 pm
SCOOBY Wed May 12, 2010 4:00 pm
divide inside pipe dia by 2, and after centering spindle over tube, move that amount over, that'll put the spindle centered on the edge of the tube. Measure the outside diameter of your input pipe and divide that by 2 and move back that amount. For the hole i used a milling bit, but biggest i have is half inch, so after i used a router bit i had (one without a bearing) and that opened it up to enough where i can use the same boring bar thing i used to make the inner o ring grooves. To get the cutter bit in the bar opened to the right amount, i held a piece of the inlet tube in the chuck and in the tailstock drillchuck, held the boring bar. I just then adjust the cutter bit so it would cut the exact diameter i wanted. I initually cut the end of the inlet pipe to knotch it to match with the 6" hole saw, but it wasnt an exact arc match so after boring the hole and putting the pipe in, i dremel'd it to match
SCOOBY- Nozzle Newbie
- Posts : 17
Join date : 2010-05-10
Re: my nozzle project
![]() covewi Wed May 12, 2010 5:54 pm
covewi Wed May 12, 2010 5:54 pm
Do you think I could take a rough cut diameter circle of pvc and somehow use a dremel to cut the final finished diameter and an o-ring groove?
covewi- Nozzle Pro
- Posts : 248
Join date : 2009-06-07
Re: my nozzle project
![]() SCOOBY Wed May 12, 2010 6:56 pm
SCOOBY Wed May 12, 2010 6:56 pm
SCOOBY- Nozzle Newbie
- Posts : 17
Join date : 2010-05-10
Re: my nozzle project
![]() covewi Wed May 12, 2010 7:04 pm
covewi Wed May 12, 2010 7:04 pm
That will work for me. You also gave me other ways to accomplish the same thing with the tools I have. Thanks
covewi- Nozzle Pro
- Posts : 248
Join date : 2009-06-07
Re: my nozzle project
![]() SCOOBY Wed May 12, 2010 7:27 pm
SCOOBY Wed May 12, 2010 7:27 pm
SCOOBY- Nozzle Newbie
- Posts : 17
Join date : 2010-05-10
Re: my nozzle project
![]() SCOOBY Thu May 20, 2010 7:37 pm
SCOOBY Thu May 20, 2010 7:37 pm
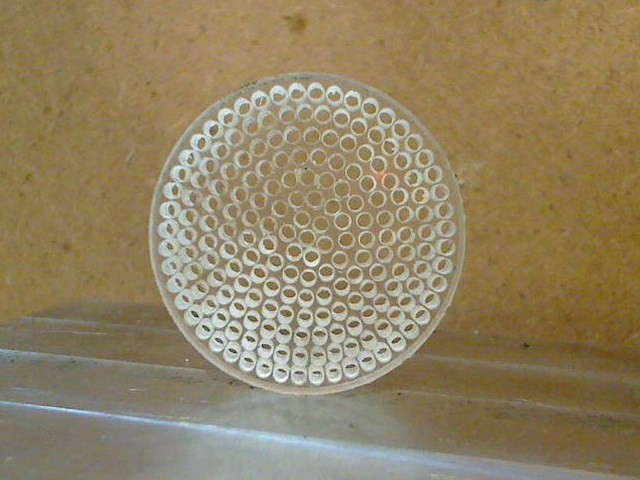
 Theres will be 2 chambers, inlet will be at the green x (not sure if i should have it tangental or not) and go through a ring (more than 3 holes of course, not finished) then through holes drilled around primary chamber (green dots)
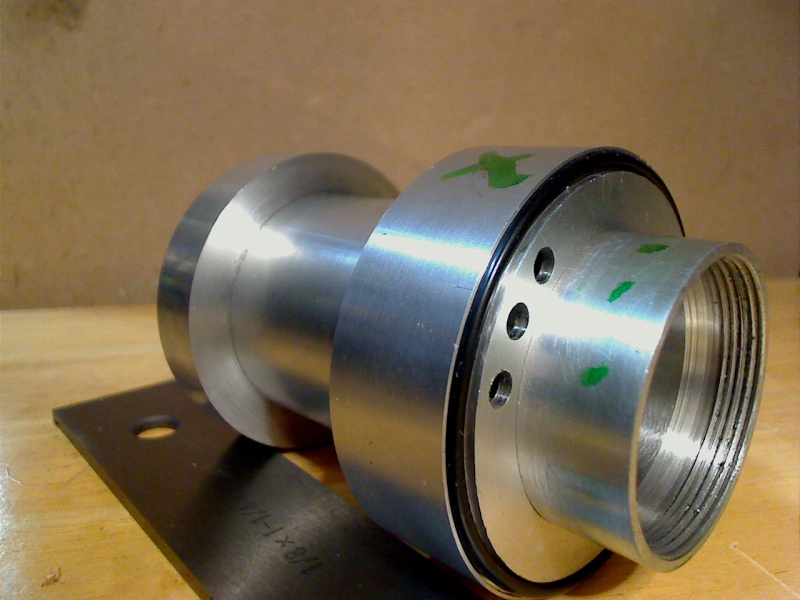 the top of course needs to be turned down and the orifice cut
 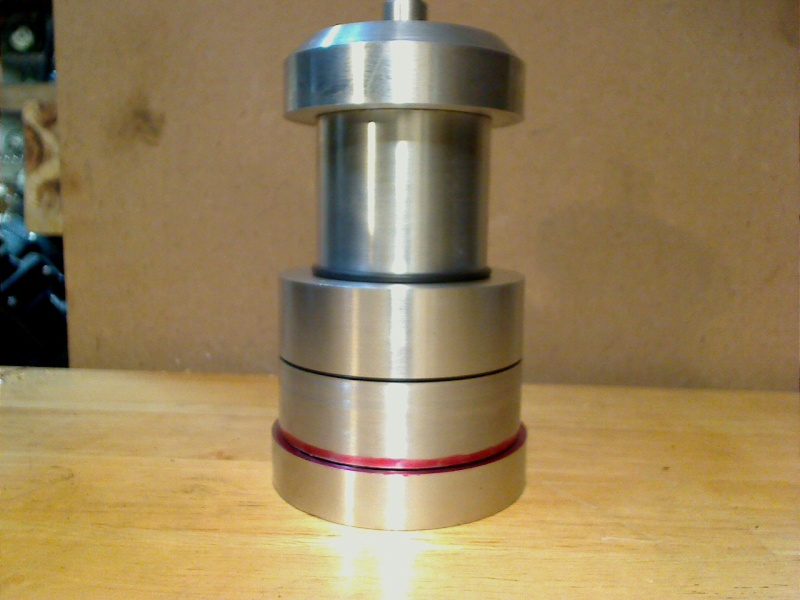 these holes are .108 thou diameter. Thanks to cnc, this whole thing took only about 10 min to make while i watched tv.
The next one i should make with smaller holes i assume. Any recomendations to the design would be appreciated
SCOOBY- Nozzle Newbie
- Posts : 17
Join date : 2010-05-10
Re: my nozzle project
![]() John Thu May 20, 2010 8:24 pm
John Thu May 20, 2010 8:24 pm
That looks great! I like the inlet chamber, and my GUESS would be that tangential is not going to matter.
What material did you make it out of? Do you own a lathe?
John- Nozzle Master
- Posts : 450
Join date : 2009-04-03
Age : 46
Location : Utah -
Re: my nozzle project
![]() SCOOBY Fri May 21, 2010 5:57 am
SCOOBY Fri May 21, 2010 5:57 am
SCOOBY- Nozzle Newbie
- Posts : 17
Join date : 2010-05-10
Re: my nozzle project
![]() SCOOBY Fri May 21, 2010 7:36 am
SCOOBY Fri May 21, 2010 7:36 am
Say for instance my first ring has 20 holes .187 inches in diameter. Should i calculate the total area of all holes combined and make # of holes and size (find total area) that i drill into the main chamber equal to it? And same for the plates inside with holes. As the holes get smaller, i make more holes, but would making the area equal be a good idea?
I tend to think too much about things.. brain hurts.. haha
SCOOBY- Nozzle Newbie
- Posts : 17
Join date : 2010-05-10
Re: my nozzle project
![]() Steffen Fri May 21, 2010 12:05 pm
Steffen Fri May 21, 2010 12:05 pm
To minimize the drop in pressure you will want to maximize the total area for water to flow. So progress to smaller holes but have lots of them to avoid large drops in pressure.
EDIT: Both nozzles look awesome by the way! Thumbs up!
Steffen- Nozzle Newbie
- Posts : 11
Join date : 2010-01-15
Re: my nozzle project
![]() SCOOBY Fri May 21, 2010 12:57 pm
SCOOBY Fri May 21, 2010 12:57 pm
total area is pie r squared which is (.185/2) = .0925 squared x pie = .026866625 x 20 holes = .5373325 area
I don't have a rotary table or indexer but the gear on the back of the lathe has 40 teeth. So i held a scribe in the toolpost and marked 40 lines off. To figure out the size of the drill bit i just worked backwards.
(.5373325/40)/Pie = .004278125 squarooterized = .065407377, which is the radius so x2 = .131 rounded. So i drilled 40 holes that size.. working on the orifice now
SCOOBY- Nozzle Newbie
- Posts : 17
Join date : 2010-05-10
Re: my nozzle project
![]() Steffen Fri May 21, 2010 1:06 pm
Steffen Fri May 21, 2010 1:06 pm
Steffen- Nozzle Newbie
- Posts : 11
Join date : 2010-01-15

liteglow- Admin
- Posts : 523
Join date : 2009-04-02
Age : 42
Location : Norway -
Re: my nozzle project
![]() SCOOBY Fri May 21, 2010 8:30 pm
SCOOBY Fri May 21, 2010 8:30 pm
SCOOBY- Nozzle Newbie
- Posts : 17
Join date : 2010-05-10
Re: my nozzle project
![]() covewi Fri May 21, 2010 9:44 pm
covewi Fri May 21, 2010 9:44 pm
I looked at your description for finding the tangential water inlet location - for drilling the hole - and want to give a made up example to clarify things.
Say the inside diameter of the tube is 8.0 inches and the outside diameter is 8.5 inches (again made up numbers).
What is the math to determine drilling location. Will that be the center for the drilling?
It also seems when drilling a circle into the outside curve of the tube the drilled hole comes out oblong? If so, how do I correct it to fit a round water inlet tube?
Thanks.
covewi- Nozzle Pro
- Posts : 248
Join date : 2009-06-07
Re: my nozzle project
![]() Steffen Sat May 22, 2010 1:28 am
Steffen Sat May 22, 2010 1:28 am

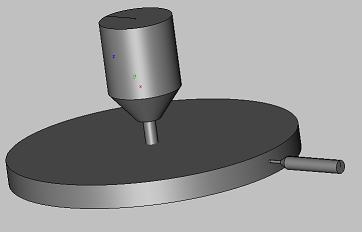
As the illustration shows:
x1 is the distance from the centerline of the nozzle tube to the center of inlet
x2 is the distance from the outer edge of the nozzle tube to the center of inlet
So in your example, and with a 1 inch inlet hole you get:
x1 = (8-1)/2 = 3,5 inches from the centerline
or
x2 = (8.5-8+1)/2 = 0.75 inches from the edge of tube
If you add these two numbers up you get 3.5 + 0.75 = 4.25 and that is the radius of the tube (8.5/2 = 4.25) so the math is correct.
Just change OD,ID and d in the equations in the illustration with your numbers and you will get the correct distances for a hole that is perfectly tangent to the inner edge of a tube.
Last edited by Steffen on Sat May 22, 2010 5:51 am; edited 1 time in total
Steffen- Nozzle Newbie
- Posts : 11
Join date : 2010-01-15
Re: my nozzle project
![]() covewi Sat May 22, 2010 5:30 am
covewi Sat May 22, 2010 5:30 am
The illustration would be helpful - did not seem to show up on your posting.
covewi- Nozzle Pro
- Posts : 248
Join date : 2009-06-07
Re: my nozzle project
![]() Steffen Sat May 22, 2010 5:48 am
Steffen Sat May 22, 2010 5:48 am
Steffen- Nozzle Newbie
- Posts : 11
Join date : 2010-01-15
Steffen- Nozzle Newbie
- Posts : 11
Join date : 2010-01-15
Re: my nozzle project
![]() covewi Sat May 22, 2010 5:59 am
covewi Sat May 22, 2010 5:59 am
Who said in grammer school - " I will never use this stuff"
covewi- Nozzle Pro
- Posts : 248
Join date : 2009-06-07
Page 1 of 2 • 1, 2 ![]()
» Khattak's Laminar Flow Nozzle Project
» Liteglow`s laminar project
» My Project
» NEW PROJECT TIME