Magic_Nozzle's Laminar Project
+4
Therons
John
liteglow
Magic-nozzle
8 posters
Page 1 of 3
Page 1 of 3 • 1, 2, 3 
 Magic_Nozzle's Laminar Project
Hi Folks, i just want to show my new Video, I finished now my light setup and have more than 60- 70% more light in my Water-arch.
I hope you like it.
Mario
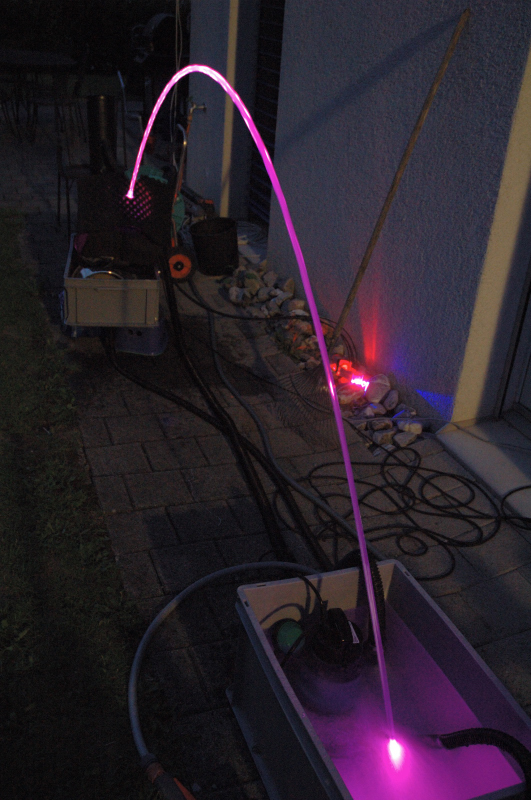
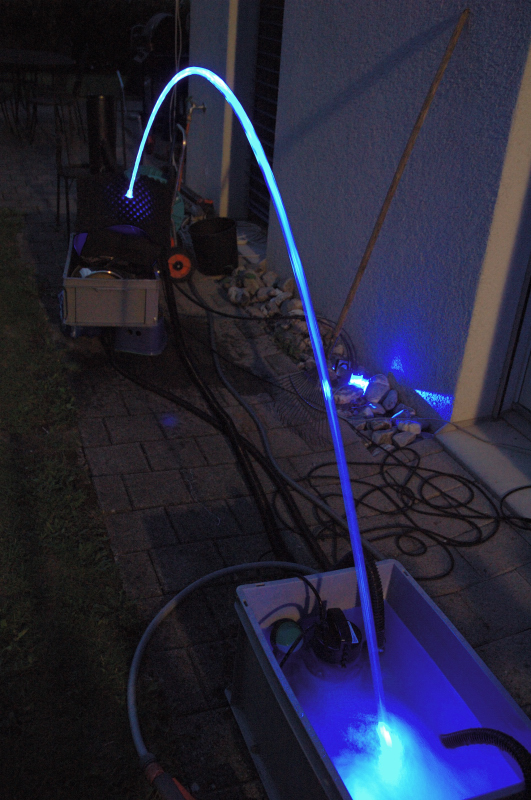
I hope you like it.
Mario

Last edited by Magic-nozzle on Mon Apr 06, 2009 5:59 am; edited 1 time in total
Magic-nozzle- Nozzle Grand Master

- Posts : 287
Join date : 2009-04-02
Age : 55
Location : Europe
 Re: Magic_Nozzle's Laminar Project
I did find out about the images..
you did only use: www.image.jpg
U forgot to use http://
you did only use: www.image.jpg
U forgot to use http://
 Re: Magic_Nozzle's Laminar Project
Thank you, now i know how.
Regards
Magic Nozzle
Regards
Magic Nozzle

Magic-nozzle- Nozzle Grand Master

- Posts : 287
Join date : 2009-04-02
Age : 55
Location : Europe
 Re: Magic_Nozzle's Laminar Project
It's always a pleasure to see the best of the best DIY laminar nozzles! Magic-nozzle is to my nozzle knowledge the best out there! I only hope to approach his expertise someday!
 Re: Magic_Nozzle's Laminar Project
Hello John, thank you, great to have you here in this forum.  Hope to see some Pics from your great work here in the future. And please send your cool BLOG link.

Magic-nozzle- Nozzle Grand Master

- Posts : 287
Join date : 2009-04-02
Age : 55
Location : Europe
 Re: Magic_Nozzle's Laminar Project
Hi
wow that is so nice !!
Did you use the fiber injector lense there ?
What did you do to get the light so much brighter ?
I must say I`m impressed of your work.. really really like it !
Congratulation for the nice job you have done there.
I want to know How you did the light so good
btw: is the "knocker" a must to have?
 Re: Magic_Nozzle's Laminar Project
Regarding the knocker,
I was playing around with mine last night and I was thumping the bottom of the nozzle and it would produce a beautiful little ripple in the water. Is that how you reproduce the knocker? Do you just use a solenoid to reproduce that? Is it just a pull solenoid with a spring return? Do you actually thump the bottom, the top, or housing? Does anyone have pictures on how they did this?
I was playing around with mine last night and I was thumping the bottom of the nozzle and it would produce a beautiful little ripple in the water. Is that how you reproduce the knocker? Do you just use a solenoid to reproduce that? Is it just a pull solenoid with a spring return? Do you actually thump the bottom, the top, or housing? Does anyone have pictures on how they did this?
 Re: Magic_Nozzle's Laminar Project
John wrote:Regarding the knocker,
I was playing around with mine last night and I was thumping the bottom of the nozzle and it would produce a beautiful little ripple in the water. Is that how you reproduce the knocker? Do you just use a solenoid to reproduce that? Is it just a pull solenoid with a spring return? Do you actually thump the bottom, the top, or housing? Does anyone have pictures on how they did this?
I dont know the setup, and where to place the solenoid !
But yes you are correct, all you need is a solenoid that shake the nozzle
Maybe have a ballast on the solenoid so it make a bigger "shake"
I think a knocker can be a nice replacment if you DONT have any cutter..
But I dont think that I need both a cutter and a knocker on the same nozzle !
 Re: Magic_Nozzle's Laminar Project
Magic-Nozzle!
That video is awesome! I finally got the chance to watch it! That is amazing! You did a great job of filming and talking at the same time. I always have a hard time with that! I'm still amazed by the quality of the stream and with the FIBER OPTICS being soooooooo close to the brass nozzle.
Question. How do you hold the fiber opitcs in place once they are past the straws? Do you do anything special to hold them there?
 Re: Magic_Nozzle's Laminar Project
Hello Guy's, thank you so much for your compliments about my light setup  .
.
You Questions, i start with the Knocker: Yes i think this is a must if you plan to have light in your Nozzle.
You cant see the effect in the video, because the camera cant catch this great flashes in the stream.
To Watch what a knocker is looking, just have a look at this video, not mine, but it looks like this.
https://www.youtube.com/watch?v=05VcA081uXA&feature=related
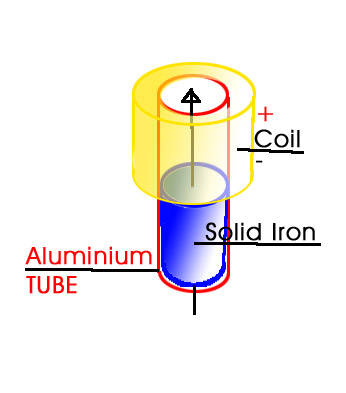
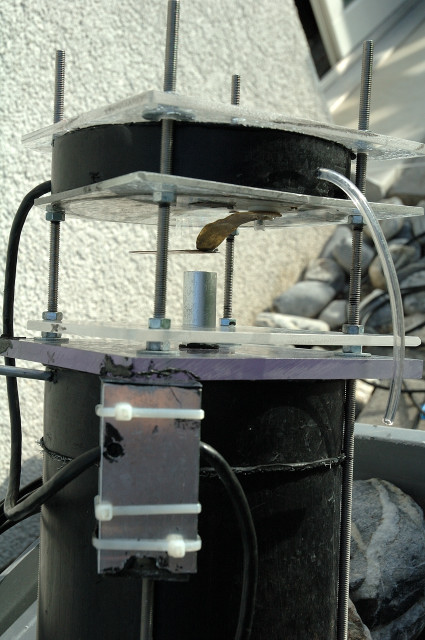
In the following Picture you can see how i made my Knocker. Just a Aluminum tube, a steel core, not stainless!(Is not magnetic), and on one end of the alu tube a self winded coil, its easy, with a cupper thread 0.3 mm, 500 - 600 windings, you need to test how much power you need. the core has no spring, just the gravity is bring it back. I use 12V and a PWM output on my uController to produce 3 different strengthens.
*** THE FIBER AND LED *****
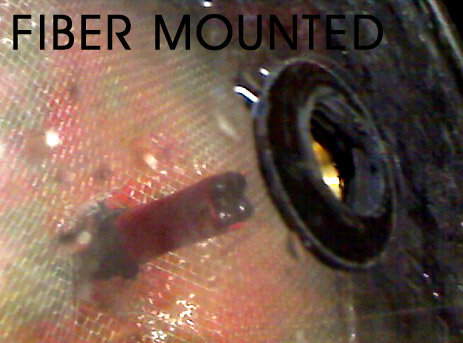
As you know, i use 4x 3W Luxeons (Red, Green, 2x Blue) 4 Fibers with 3mm diameter. The ends high polished!
Direct, with no Fiber injector, from the LED (touching the led with the fiber) to the Nozzle. In the center of my nozzle (Bottom to the last chamber) i mounted a tube, right size for 4 fibers, the tube is holding in place by the thick 1/2 inch bottom of the nozzle, in the nozzle is just holding a little bit by the straws and the grid mesh i mounted. the last 2 1/2 inch the fibers are free, just a shrinking isolator around and in the center a strong 2 - 3 mm brass stick to hold iT STRAIGHT. You must test how close to the end your nozzle can handle, closest is in my case less than one inch. Only since i have mounted the brass nozzle (John's Idea) i have such a cool water stream, before, when i came close to the outlet the water had terrible turbulence.
I optimized the Constant circuit and drive now with 980 mA for green and Blue, and 1400 for the Red LED, maximum power! A very cool thing i found out, if you put some cooling liquid for steel cutting in the water, just a little bit, the water becomes a little milky, with no light you cant see a thing, but by night ... extreme bright! I thin this is all about.
***** MY NEW AIR VALVE ****
I now have a perfect Solution for the Air valve. I made some Pictures, should explain everything.
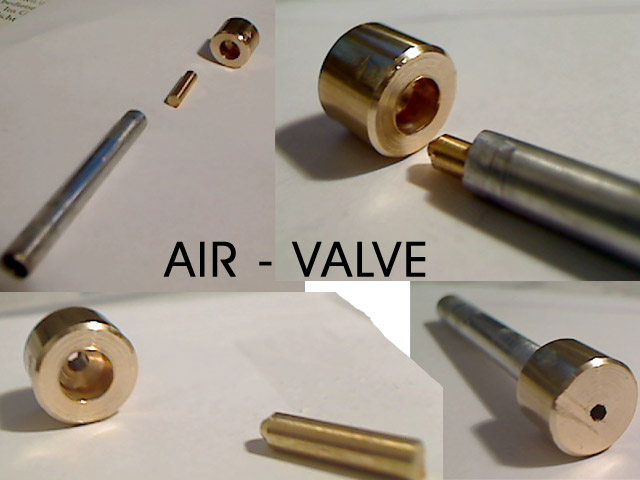
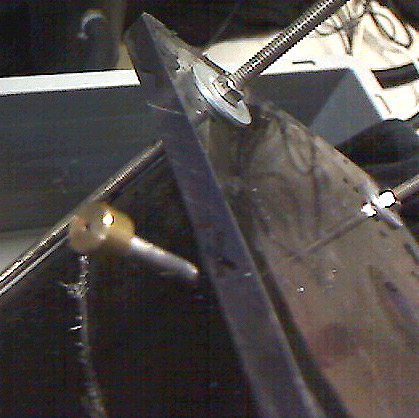
Function: when the Nozzle is filling up with water, the little sharp brass rod let the air out. When the nozzle is full, the water is pressing out, the little brass rod is closing the valve at the end.
That's all
Mario
You Questions, i start with the Knocker: Yes i think this is a must if you plan to have light in your Nozzle.
You cant see the effect in the video, because the camera cant catch this great flashes in the stream.
To Watch what a knocker is looking, just have a look at this video, not mine, but it looks like this.
https://www.youtube.com/watch?v=05VcA081uXA&feature=related
In the following Picture you can see how i made my Knocker. Just a Aluminum tube, a steel core, not stainless!(Is not magnetic), and on one end of the alu tube a self winded coil, its easy, with a cupper thread 0.3 mm, 500 - 600 windings, you need to test how much power you need. the core has no spring, just the gravity is bring it back. I use 12V and a PWM output on my uController to produce 3 different strengthens.

*** THE FIBER AND LED *****
As you know, i use 4x 3W Luxeons (Red, Green, 2x Blue) 4 Fibers with 3mm diameter. The ends high polished!
Direct, with no Fiber injector, from the LED (touching the led with the fiber) to the Nozzle. In the center of my nozzle (Bottom to the last chamber) i mounted a tube, right size for 4 fibers, the tube is holding in place by the thick 1/2 inch bottom of the nozzle, in the nozzle is just holding a little bit by the straws and the grid mesh i mounted. the last 2 1/2 inch the fibers are free, just a shrinking isolator around and in the center a strong 2 - 3 mm brass stick to hold iT STRAIGHT. You must test how close to the end your nozzle can handle, closest is in my case less than one inch. Only since i have mounted the brass nozzle (John's Idea) i have such a cool water stream, before, when i came close to the outlet the water had terrible turbulence.
I optimized the Constant circuit and drive now with 980 mA for green and Blue, and 1400 for the Red LED, maximum power! A very cool thing i found out, if you put some cooling liquid for steel cutting in the water, just a little bit, the water becomes a little milky, with no light you cant see a thing, but by night ... extreme bright! I thin this is all about.

***** MY NEW AIR VALVE ****
I now have a perfect Solution for the Air valve. I made some Pictures, should explain everything.


Function: when the Nozzle is filling up with water, the little sharp brass rod let the air out. When the nozzle is full, the water is pressing out, the little brass rod is closing the valve at the end.
That's all
Mario

Magic-nozzle- Nozzle Grand Master

- Posts : 287
Join date : 2009-04-02
Age : 55
Location : Europe
 Re: Magic_Nozzle's Laminar Project
Thanx for sharing the photos 
I must say I`m impressed with your work..
It`s almost like I just want to buy 4 from you haha.. then I dont have to bother myself making any
But half the fun is to build and make this stuff
I just want to ask one question, if you REMOVE the straws..
And replace it with a sponge ... what result do you have then ?
I did make one laminar jet, and in the bottom I have a big sponge.. then the water float up the pipe with NO straws..
The water was perfect on the output !
So i think that if there is "low power" on the laminar, I guess we dont need the straws?
But to be safe, i think maybe it`s best to use it anyway...
What I need to find now is some fiber optic cables !
 Re: Magic_Nozzle's Laminar Project
liteglow wrote:Thanx for sharing the photos
I just want to ask one question, if you REMOVE the straws..
And replace it with a sponge ... what result do you have then ?
I did make one laminar jet, and in the bottom I have a big sponge.. then the water float up the pipe with NO straws..
The water was perfect on the output !
So i think that if there is "low power" on the laminar, I guess we dont need the straws?
But to be safe, i think maybe it`s best to use it anyway...
Technically anything moving slow enough is laminar. On my faucets at home if you turn them down low enough you will get the crystal clear laminar stream. It's when you turn up the flow that it breaks up and become turbulent. IMO, the straws are the most critical part to making the stream laminar. The length and the diameter of the straws all come in to play as to how large of a flow rate it can handle before it starts to break up.
I believe the way it works as the water enters the big pipe the water is moving in every direction and at various speeds. Once the water starts to enter the pipe the water on the edges moves slower due to friction and surface tension. As the water exits the end of the straw (provided the straw is long enough) you will have a parabolic velocity profile.

This is for a blood vessel but it works. So as the water exits the straw you have a parabolic velocity profile, and with all of the straws exiting with the same profile as the water progresses to the exit the water mixes together to create a uniform velocity profile across the entire big tube. Essentially it averages out the speeds, and everything is moving at the same speed in the tube. It progresses toward the exit as it shoots out the exit. Everything is still moving at the same speed (more or less).
So the important part to this is to make sure that you have straws that are long enough to handle the flow that you want. There are equations to help you determine the length of the straws, but they are pretty difficult to use if you don't have the Reynolds number.
If you are going to use smaller diameter straws you will be able to reduce the length that is needed for the straw section. However, doing so will increase the resistance since there is more surface area and therefore more friction /surface tension between the water and the straws.
 Re: Magic_Nozzle's Laminar Project
Wow, great explanation, i couldn't say it better. If we look at professional Nozzles, a few of them don't use straws, they use filter and a strainer metal plate, with 300 little holes, the plate is not thicker than 2 - 3 mm, and it works very well and need just a little space against straws. I did not test it but i have seen some drawings in a manual.

Magic-nozzle- Nozzle Grand Master

- Posts : 287
Join date : 2009-04-02
Age : 55
Location : Europe
 Re: Magic_Nozzle's Laminar Project
Do you remember where you saw that manual with the strainer metal plate? I'd be interested to find out how that design worked.
 Re: Magic_Nozzle's Laminar Project
I was looking around and found something interesting, see this repair parts http://www.sunwind-klaeui.ch/oaseersatzteilkatalog_2008.pdf from Oase, on Page 59 and 60 (also in English) you can see how the nozzle of them work. I can see they use the Power led direct in the nozzle, interesting.
Here is the secret they use (in English):
http://www.teich-center.com/bilder/oase/jumping_jet/Jumping_Jet_Rainbow_star/50052_jumping_jet_rainbow_star_multi.pdf
Look at page 25 Maintenance and cleaning, You can read what they use, and on Page 6 you can see who is who. diffusor plate (46), screen (45) and 4 is the foam. But what is screen 45?
What i would give to see one Jumping_Jet open and have a look inside at the technique.
This is also very cool, a manual only in german but with Pictures, how to install it in your garden.
http://www.oase-livingwater.com/wg/data/media/downloads/we_waterdesign_de.pdf
This will help you, please post your meaning about it.

Magic-nozzle- Nozzle Grand Master

- Posts : 287
Join date : 2009-04-02
Age : 55
Location : Europe
 Re: Magic_Nozzle's Laminar Project
Hi Folks
Yesterday i finished my stand for the nozzle. As you can see, i mounted my nozzle to a heavy stone plate and can adjust any high between 40 an 90 degrees. The gray cover is the splasher, it brings the water back when the cutter is on. Inside i made some foam to reduce the noise during cut, very recommended.
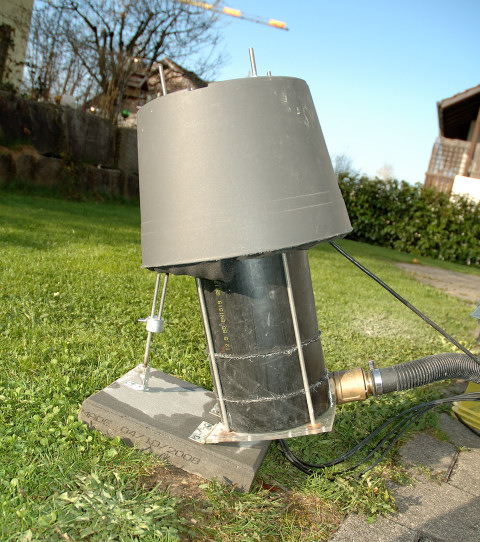
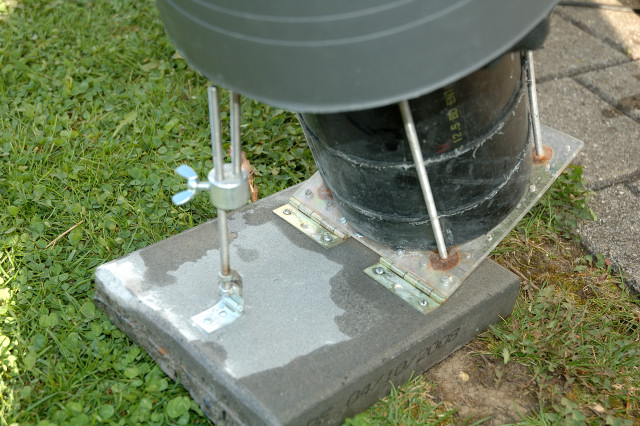
Yesterday i finished my stand for the nozzle. As you can see, i mounted my nozzle to a heavy stone plate and can adjust any high between 40 an 90 degrees. The gray cover is the splasher, it brings the water back when the cutter is on. Inside i made some foam to reduce the noise during cut, very recommended.

Magic-nozzle- Nozzle Grand Master

- Posts : 287
Join date : 2009-04-02
Age : 55
Location : Europe
 Cutter Test in the Garden - make it noiseless
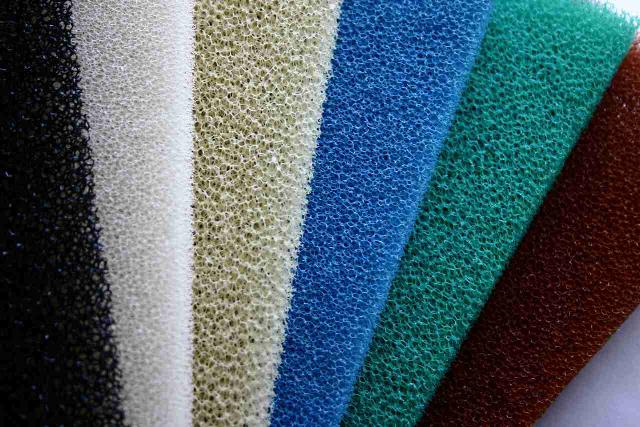
A New test with my nozzle, in the Garden. I was trying to reduce the splash sound after a Cut, Successful with a foam, others use this kind of foam in aquarium as Filter, its a kind a filter Sponge.
And Yes, i have too much spare time this long Weekend.


looks like this
And here my new Video
Have Fun
Mario
And Yes, i have too much spare time this long Weekend.
looks like this

And here my new Video
Have Fun
Mario

Magic-nozzle- Nozzle Grand Master

- Posts : 287
Join date : 2009-04-02
Age : 55
Location : Europe
 Re: Magic_Nozzle's Laminar Project
Wow thanx for the PDF files 
It was some nice info there to study....
You got green garden outside now ?
I`m jealous, it`s still snow in my garden.. but it`s going away the next weeks..
Your laminar looks perfect
As I ses on the video, it seems like the cutter is still your problem... hmz
Is your solenoid moving to slow ?
It was some nice info there to study....
You got green garden outside now ?
I`m jealous, it`s still snow in my garden.. but it`s going away the next weeks..
Your laminar looks perfect
As I ses on the video, it seems like the cutter is still your problem... hmz
Is your solenoid moving to slow ?
 Re: Magic_Nozzle's Laminar Project
Thank you Filip, i like it to doing research about nozzles.
I don't know if any solenoid can be faster than the one i have?
Here little Video: Speedtest, is yours Faster?
When they are too fast, you have a earthquake in the nozzle, not good for the stream.
What do you think about making a cutter like they use in camera lenses, this would be perfect, closes exactly everywhere at the same time. look this picture.

What you mean, is it difficult to build one? i really like the idea. But i don't like to start again, this cutter takes the most time of my nozzle, and is still not perfect but usable.
Let me know what you think.
I don't know if any solenoid can be faster than the one i have?
Here little Video: Speedtest, is yours Faster?
When they are too fast, you have a earthquake in the nozzle, not good for the stream.
What do you think about making a cutter like they use in camera lenses, this would be perfect, closes exactly everywhere at the same time. look this picture.

What you mean, is it difficult to build one? i really like the idea. But i don't like to start again, this cutter takes the most time of my nozzle, and is still not perfect but usable.
Let me know what you think.

Magic-nozzle- Nozzle Grand Master

- Posts : 287
Join date : 2009-04-02
Age : 55
Location : Europe
 Re: Magic_Nozzle's Laminar Project
Hmm your cutter is very fast..
Same speed as mine
I guess the speed will be "almost" the same on every 12volt solenoid..
Ah you did find a camera light shutter that is a smart idea..
But I actually don't know ?
I still think that the idea of "cut" the beam in the same speed it travel is the best...
Same speed as mine
I guess the speed will be "almost" the same on every 12volt solenoid..
Ah you did find a camera light shutter
But I actually don't know ?
I still think that the idea of "cut" the beam in the same speed it travel is the best...
 Thoughts on the cutter
Mario - You're amazing! You truly have resolved most of the issues.
I've seen some of your info and videos elsewhere and have talked about you with John (we live within a half hour).
I appreciate the invitation to the forum that you left me on my Youtube video of the laminartest1.
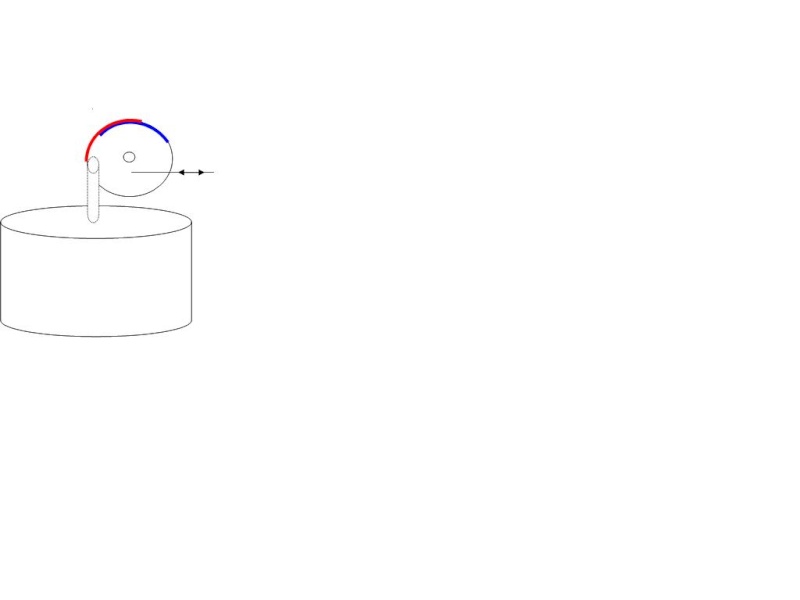
I have thought quite a bit about the cutter but I'm not sure I have a good answer. There are two options that I would like to pursue. 1. Use two opposing cutters that have half circle cut-outs on the edges that come together. This would be a start on the idea of the "camera shutter" mechanism. I also think that opposing action of the cutters may help to ballance the movement thus reducing the amount of jarring to the unit. 2. The second method would be to use a verticle wheel with a diverter plate that covers about one quarter of the wheel. The selenoid would rotate the wheel moving the diverter plate into the stream. This would cause the stream to spray away from the nozzle thus reducing the amount of splash back towards the nozzle. Also, when the wheel rotates into the open position, the diverter plate would move up following the stream travel thus (hopefully - depending on timing) "un-cutting" the stream at one point in the flow. I have attached a diagram that will hopefully explain the concept a little better. The red shows the plate in the cut or diverting position and the blue is the diverter plate in the open or uncut position.
Theron
I've seen some of your info and videos elsewhere and have talked about you with John (we live within a half hour).
I appreciate the invitation to the forum that you left me on my Youtube video of the laminartest1.
I have thought quite a bit about the cutter but I'm not sure I have a good answer. There are two options that I would like to pursue. 1. Use two opposing cutters that have half circle cut-outs on the edges that come together. This would be a start on the idea of the "camera shutter" mechanism. I also think that opposing action of the cutters may help to ballance the movement thus reducing the amount of jarring to the unit. 2. The second method would be to use a verticle wheel with a diverter plate that covers about one quarter of the wheel. The selenoid would rotate the wheel moving the diverter plate into the stream. This would cause the stream to spray away from the nozzle thus reducing the amount of splash back towards the nozzle. Also, when the wheel rotates into the open position, the diverter plate would move up following the stream travel thus (hopefully - depending on timing) "un-cutting" the stream at one point in the flow. I have attached a diagram that will hopefully explain the concept a little better. The red shows the plate in the cut or diverting position and the blue is the diverter plate in the open or uncut position.

Theron
Therons- Nozzle Novice

- Posts : 53
Join date : 2009-04-11
Location : North Salt Lake, Utah, USA
 Re: Magic_Nozzle's Laminar Project
Another idea would be a motor constantly spinning at a high speed. This would be attached to a clutch device (where we would get this I don't know) where it could engage and disengage at your command. This would engage some sort of wheel cutting device like Theron's idea.
The advantage of this is that your motor is already spinning at the high speed. All it needs to do is engage the clutch to cut.
I don't know. Just thinking outloud here.
The advantage of this is that your motor is already spinning at the high speed. All it needs to do is engage the clutch to cut.
I don't know. Just thinking outloud here.
 Re: Magic_Nozzle's Laminar Project
Therons wrote:Mario - You're amazing! You truly have resolved most of the issues.
I've seen some of your info and videos elsewhere and have talked about you with John (we live within a half hour).
Hello Theron
Nice to have you here in the Forum, thank you for following the invitation.
Second thank you for your compliments
Your first idea for a Cutter is cool, cut like a scissor. If i have time, maybe i want to try it to build one, but its a lot of work and when i don't have success.
The second one i don't understand exactly what it is, maybe because my English is not so well.
The other idea i had, to use not a metal plate to cut, but a Teflon plate, the water can easily glide on the knife and has not that hard scratching effect. not sure this will help, and the bigger Problem, i don't know where to find TEFLON, I can beak apart a pan ... *GIGGLE* OK better not.
JOHN: Your idea sounds interesting to, but i see, easy cutting and perfect uncut, not a easy Job.
The Problem of the uncut increase when the water pressure is higher, with less pressure its easier to have a nice uncut.
mario

Magic-nozzle- Nozzle Grand Master

- Posts : 287
Join date : 2009-04-02
Age : 55
Location : Europe
 Re: Magic_Nozzle's Laminar Project
There is a material like plastic that is used a lot for bushings, and it is naturally slick like teflon. It's called Delrin. It's pretty similiar to Nylon. http://www.mcmaster.com/#plastics/=1f5lvhj
Something like that might work instead of teflon. It's really easy to machine.
I'm think that the problem might not be the speed of the cut, but the shape of the blade.
Something like that might work instead of teflon. It's really easy to machine.
I'm think that the problem might not be the speed of the cut, but the shape of the blade.
Page 1 of 3 • 1, 2, 3 
 Similar topics
» Liteglow`s laminar project
» Mr Webb's Laminar Project.
» Jetty's Wifi Web Based Laminar Jet Project
» Ike's Prototype Project - My first laminar nozzle
» My Laminar Garden Project - Finally Installed
» Mr Webb's Laminar Project.
» Jetty's Wifi Web Based Laminar Jet Project
» Ike's Prototype Project - My first laminar nozzle
» My Laminar Garden Project - Finally Installed
Page 1 of 3
Permissions in this forum:
You cannot reply to topics in this forum|
|
|

