My Project
Page 8 of 10 •  1, 2, 3, 4, 5, 6, 7, 8, 9, 10
 ![]()
liteglow- Admin
- Posts : 523
Join date : 2009-04-02
Age : 42
Location : Norway -

Re: My Project
![]() covewi Fri Jul 16, 2010 1:47 pm
covewi Fri Jul 16, 2010 1:47 pm
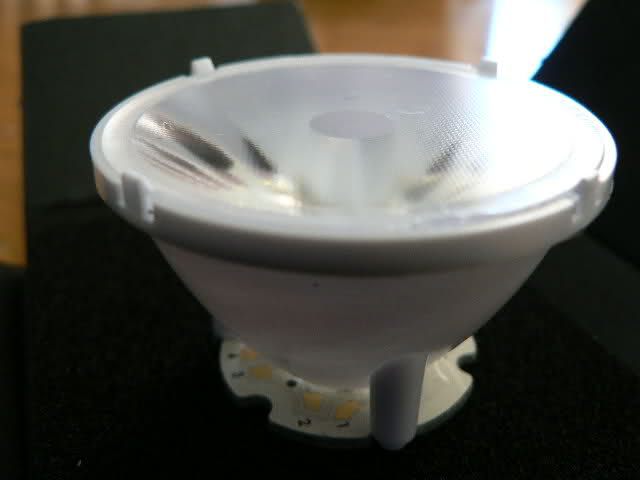
and the 15 degree LED lens
Maybe a test lighting tonight.
Last edited by covewi on Fri Jul 16, 2010 9:03 pm; edited 1 time in total
covewi- Nozzle Pro

- Posts : 248
Join date : 2009-06-07
Re: My Project
![]() covewi Fri Jul 16, 2010 8:29 pm
covewi Fri Jul 16, 2010 8:29 pm
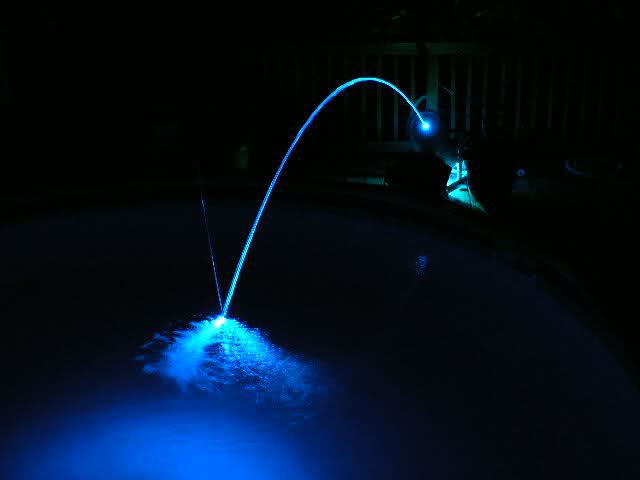
The 15 degree lens was crap - its gone.
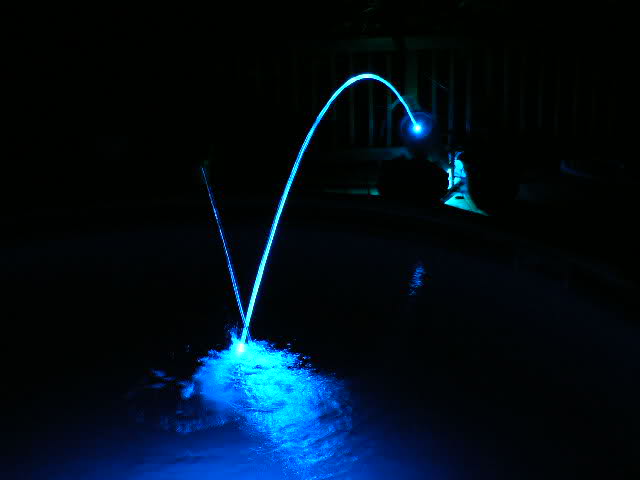
I placed the LED at the end of the plexiglass light rod and WOW.
The LM317 regulators with the heat sink only get warm.
But the LED GETS HOT - ( I was running it without a fan for the photos though) will take care of that tomorrow.
Wonder how to attach the heat sink with LED to the bottom of the light rod?
Wonder if I will get the same brightness by running 4/5 3 mm fiber optic cable from the LED to the light rod?
Man you got to get one of these.
These photos are not retouched or are they a time exposure - the stream is really that bright - even from the side.


covewi- Nozzle Pro
- Posts : 248
Join date : 2009-06-07
Re: My Project
![]() John Sat Jul 17, 2010 9:23 am
John Sat Jul 17, 2010 9:23 am

John- Nozzle Master

- Posts : 450
Join date : 2009-04-03
Age : 46
Location : Utah -
Re: My Project
![]() liteglow Sat Jul 17, 2010 4:58 pm
liteglow Sat Jul 17, 2010 4:58 pm
Where did you get that 40W led ?
I still think that sound to much for a LED
Anyway, the results seems great
liteglow- Admin
- Posts : 523
Join date : 2009-04-02
Age : 42
Location : Norway -
Re: My Project
![]() covewi Sat Jul 17, 2010 5:58 pm
covewi Sat Jul 17, 2010 5:58 pm
http://www.mouser.com/Search/Refine.aspx?FS=TRUE&N=254227+4294758820+1323038&Ns=P_SField\
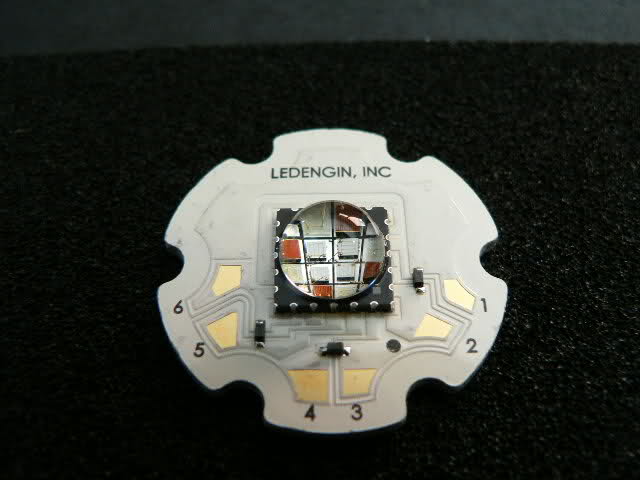
Look for all the LEDENGIN brands. Their website - www.ledengin.com
Here is the RGB LED
http://www.mouser.com/Search/Refine.aspx?FS=TRUE&N=254227+4294758820+1323038&Ns=P_SField
Heres an RGB and Amber
http://www.mouser.com/Search/Refine.aspx?FS=TRUE&N=254227+4294758820+1323038&Ns=P_SField
There are 12 LED's in my RGB unit - 4 of each color. Expensive if you trash it - but otherwise well worth the results and needing to only worry about hooking up 1 LED.
covewi- Nozzle Pro
- Posts : 248
Join date : 2009-06-07
Re: My Project
![]() John Sat Jul 17, 2010 7:44 pm
John Sat Jul 17, 2010 7:44 pm
John- Nozzle Master
- Posts : 450
Join date : 2009-04-03
Age : 46
Location : Utah -
Re: My Project
![]() covewi Sat Jul 17, 2010 8:16 pm
covewi Sat Jul 17, 2010 8:16 pm
The 40 watter's are 28 mm in diameter and the led itself is 9 mm in diameter - the "dome" of the led is also higher by around 3 mm.
Larger size but it does house 12 color chips.
It gets HOT!
Ike was correct - no more lighting for me until I get a CPU heatsink and cooling fan.
Man I love these things.
covewi- Nozzle Pro
- Posts : 248
Join date : 2009-06-07
Re: My Project
![]() covewi Mon Jul 19, 2010 5:16 pm
covewi Mon Jul 19, 2010 5:16 pm
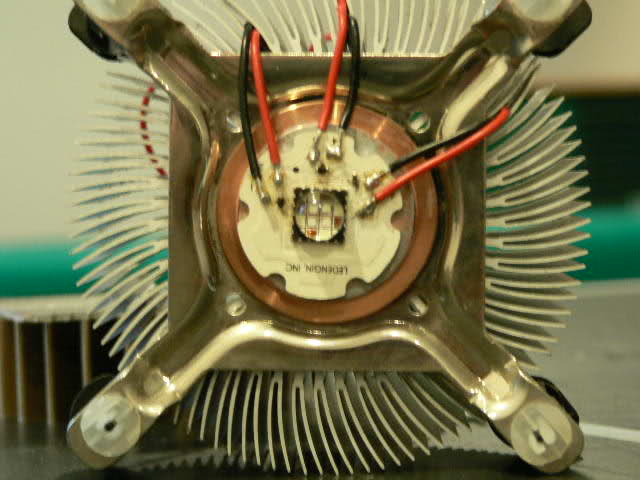
Next best thing - steal parts out of my son's PC he left behind.
I could not have figured out anything better than what I found.
The copper plate ( which is the best conductive material for heat) on the heatsink was a perfect fit for the LED.
I also cut out the fan holder to use it as a LED holder - not installed yet.
Attached the heatsink fan - the LED base and the copper plate is cool to the touch but when the blue light
Is on the LED dome gets hot to the touch. I don't think that is anything to worry about though.
I would like to have LED right up on the end of the plexiglass light rod - maybe it could be housed in a piece of pvc tube somehow.
Suggestions welcomed
covewi- Nozzle Pro
- Posts : 248
Join date : 2009-06-07
Re: My Project
![]() Ike Mon Jul 19, 2010 10:23 pm
Ike Mon Jul 19, 2010 10:23 pm
That would give you a secure base for your heatsink and LED and make for easy alignment with your plexiglass rod. You'd also get the benefit of easy removal of the heatsink and LED should you need to tinker with it. Just unattach it from the clip.
Ike- Nozzle Novice

- Posts : 74
Join date : 2010-05-03
Age : 39
Location : Wyoming
Re: My Project
![]() covewi Tue Jul 20, 2010 8:05 pm
covewi Tue Jul 20, 2010 8:05 pm
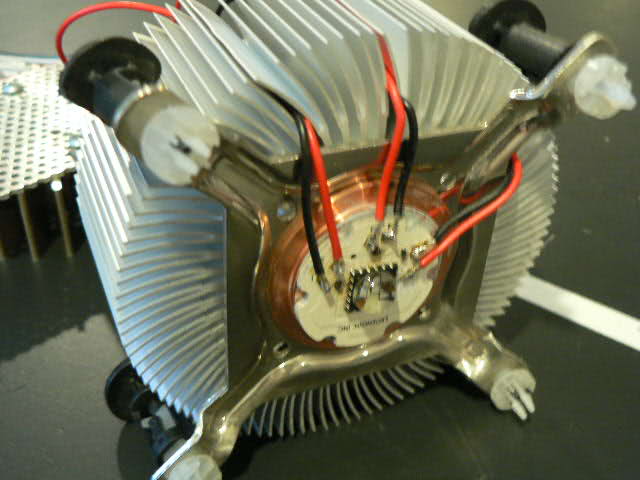
http://ledengin.com/products/40wLZ/LZC-00MC40.pdf page #7
(except for the blue - which explains the blinding brightness) and the LED lens dome
being so large - even six fiber optic cables could not capture all the magnificent light.
The only way to get the full effect of 40 watts is to place the LED right at the end of the light tube.
I also feel that a 1/2 inch plexiglass rod is the way to go. 6 feet is only $6.00.
Its turning out to be harder than I thought to mount the LED, heatsink and fan to the light rod.
Also this setup has to be protected from H20. Next years fountains will have to be longer to enclose this light source.
Heres the finished setup.

covewi- Nozzle Pro
- Posts : 248
Join date : 2009-06-07
John- Nozzle Master
- Posts : 450
Join date : 2009-04-03
Age : 46
Location : Utah -
Re: My Project
![]() covewi Wed Jul 21, 2010 2:42 pm
covewi Wed Jul 21, 2010 2:42 pm
When I rebuild the fountains, during the winter, I will add around 3-4 inches to the length of the main tube and mounting everything in there.
I guess this summer is another of testing testing and retesting. Hopefully next year I can be done with this - oh I forgot - a cutter system.
covewi- Nozzle Pro
- Posts : 248
Join date : 2009-06-07
Re: My Project
![]() covewi Thu Jul 22, 2010 7:55 pm
covewi Thu Jul 22, 2010 7:55 pm
covewi- Nozzle Pro
- Posts : 248
Join date : 2009-06-07
Re: My Project
![]() John Thu Jul 22, 2010 10:40 pm
John Thu Jul 22, 2010 10:40 pm
John- Nozzle Master
- Posts : 450
Join date : 2009-04-03
Age : 46
Location : Utah -
Re: My Project
![]() covewi Sat Jul 24, 2010 7:22 pm
covewi Sat Jul 24, 2010 7:22 pm
Well tonight I hooked up the light and decided it was well worth it.

covewi- Nozzle Pro
- Posts : 248
Join date : 2009-06-07
Re: My Project
![]() liteglow Sun Jul 25, 2010 9:11 am
liteglow Sun Jul 25, 2010 9:11 am
Really beautiful, wish it was dark like that here also
liteglow- Admin
- Posts : 523
Join date : 2009-04-02
Age : 42
Location : Norway -


covewi- Nozzle Pro
- Posts : 248
Join date : 2009-06-07
Re: My Project
![]() liteglow Sun Jul 25, 2010 2:05 pm
liteglow Sun Jul 25, 2010 2:05 pm
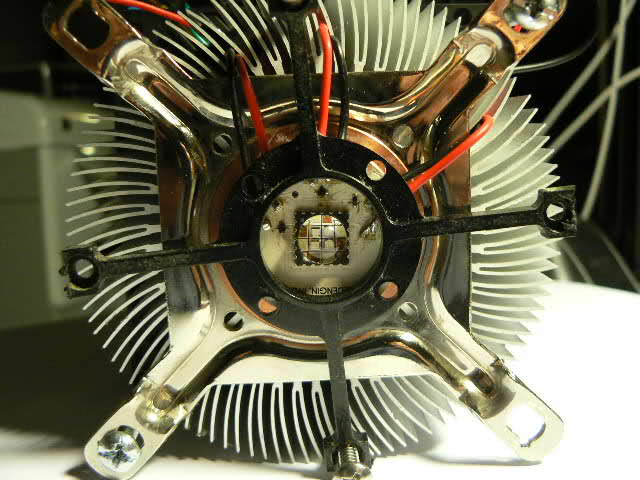
Seems like an OEM product :-)
What is that rings from? looks like a spot-light cover.
liteglow- Admin
- Posts : 523
Join date : 2009-04-02
Age : 42
Location : Norway -
Re: My Project
![]() covewi Sun Jul 25, 2010 2:23 pm
covewi Sun Jul 25, 2010 2:23 pm
I spend way too much time walking around home improvement and hardware stores looking for things "that will work"
covewi- Nozzle Pro
- Posts : 248
Join date : 2009-06-07
Re: My Project
![]() John Sun Jul 25, 2010 10:01 pm
John Sun Jul 25, 2010 10:01 pm
John- Nozzle Master
- Posts : 450
Join date : 2009-04-03
Age : 46
Location : Utah -
Re: My Project
![]() covewi Wed Jul 28, 2010 5:51 pm
covewi Wed Jul 28, 2010 5:51 pm


covewi- Nozzle Pro
- Posts : 248
Join date : 2009-06-07
Re: My Project
![]() covewi Sat Jul 31, 2010 9:15 pm
covewi Sat Jul 31, 2010 9:15 pm
any sequence of knocks that looked good.
View My Video
covewi- Nozzle Pro
- Posts : 248
Join date : 2009-06-07
Re My Project
![]() JohnJarvis Sun Aug 01, 2010 5:40 am
JohnJarvis Sun Aug 01, 2010 5:40 am
JohnJarvis- Nozzle Newbie

- Posts : 24
Join date : 2009-04-17
Re: My Project
![]() covewi Sun Aug 01, 2010 8:17 am
covewi Sun Aug 01, 2010 8:17 am
There are two LED you can get one is
RGB - http://www.mouser.com/ProductDetail/LedEngin/LZC-80MC40/?qs=sGAEpiMZZMt82OzCyDsLFCAJ84VWo9I9ki8A5XZixTI%3d
RGB and Amber - http://www.mouser.com/ProductDetail/LedEngin/LZC-A0MA40/?qs=sGAEpiMZZMt82OzCyDsLFGqf%252bUg042eRzV6TqqEYOzg%3d
I just went with the RGB - that produce 256 color combo's - but there are only around 6-8 colors that really show up well.
If you look at WET DESIGN and other laminar companies - they do not use too many colors - they keep it simple.
IF you look in the photo above ( with the light shining) you can see my three individual 700 ma voltage regulators.
VERY important - BIG HEATSINK and FAN and allow decent air flow into your enclosure.
Good Luck
covewi- Nozzle Pro
- Posts : 248
Join date : 2009-06-07
Page 8 of 10 • 1, 2, 3, 4, 5, 6, 7, 8, 9, 10 ![]()
» my nozzle project
» Mr Webb's Laminar Project.
» upgrade from 3" to 5"
» My project build thread...
|
|
|